


 Melbourne BG SCS Train Timetable


Century Southern Hotel, Shinjuku – August 2015
It was to be one night in Tokyo, whilst in transit from Hakone to Izu Peninsula. What's the quickest path? Probably a change at Odawara or Atami? Suuureee... but there's also an express train to Shinjuku from Hakone and an Express to Shimoda from Shinjuku. So, why not do it in luxury?
Hotels in Shinjuku aren't cheap... so you might as well make it count. Turns out that Odakyu has a hand in this hotel and this hotel has some stunning rooms! Check out the view from the Panorama room I stayed in!
Trains, trains and more trains... Yamanote, Express lines, Chuo line and even Odakyu!
Osaka – Imamiyaebisu – Nankai Rapi:t
Staying in Tennoji this time around meant that I was close to the main trunk like of the Nankai railway. The closest station was Shinimamiya which is a shared JR/Nankai station. It allows passengers to transfer from the loop line to the Nankai service. From here you can proceed north into the heart of Namba or south towards the Airport, Koyasan or Wakayama.
Between Shinimamiya and Namba is one station: Imamiyaebisu. This station exists on the two east-most lines and is only really served by local trains. Its location provides a great view in both directions, from both ends of the platform.
The two tracks to the west are for anything other than local trains. The expresses will pass along these lines at moderate speeds. Most express services still stop at Shinimamiya, so they wont be full tilt.
The only real drawback of the area is the ability for services to block your view and the overpass just to the north providing unwanted shade. First world problems, really. There were even other photographers there when I visited.
Southbound View
Nice sweeping curves and no issues getting full consists in the frame. Nankai has some basic liveries and a lot of stainless stock. Fortunately they like mixing it up quite a bit.
Northbound View
Northbound is just as nice... quite a straight stretch until the final right-hand curve into Namba. And then ... the consist I was waiting for approached.
The Nankai Rapi:t is the express train to Kansai International Airport. If you're staying in Namba, or don't have a railpass, then take this train when you arrive... it's fantastic.
Osaka – Super Rail Cargo
I've tried before, but always failed. The Super Rail Cargo is an express EMU freight service that runs in the middle of the night and is a hard one to photograph. Turns out though, that Japan doesn't do daylight-savings. Therefore, in summer, in the wee hours of the morning, one has a good chance of seeing this thing on the move.
One service leaves Tokyo whilst the other leaves Osaka, around the same time, nearly every night of the week. I've never tried to hunt down the Tokyo end, as it's sorta out-of-the-way down past Shinagawa. Fortunately, the Osaka side passes through Umeda, on it's way towards (and along) the Tokaido Main Line.
The Stake Out - Fukushima Station
This train runs from Ajikawaguchi yards, along the Yumesaki Line, joins the Loop Line at Nishikujo, passes Noda and then heads north where it branches off the loop at Fukushima. It's even at road-level and there's a level-crossing, so you get an advance notice of anything approaching.
I used my freight timetables as posted here to know when it might arrive. It was my last morning in Osaka, a Tuesday, and I wasn't going to miss it this time.
I was staying in Tennoji and awoke at 4am. There were no train services at that time, so I found a taxi and asked to go to Fukushima Station. The driver alerted that there was nothing to be gained in going there, but I actually stated that I hoped to take a photo and he chuckled and agreed that it was OK.
It was around 4:40am and indeed still dark.. but I was very happy to have the sun rising.. although on the wrong side for a good shot. There were lively characters coming out of Karaoke venues or bars, but also people making their way to work.
At 5:05am, the booms triggered and an EF66 with a short rake appeared. It seems this would be ▲59 making it's way from Suita. I think I still had my polariser on at this point, not really knowing the best way to shoot in low light. Hence the photos are quite dark.
A loop line service came through at 5:12am... meaning that I could've slept in a little later and taken it from Tennoji. There was no way I was going to risk that timing though.
Either way... The gates then activated again and the M250 came through!
Not the best photos... but for the first time I saw the actual service in flight; whilst I had a camera ready. Success!
Osaka – Umeda and Hirano – August 2015
The goal was simple... there's a freight train that runs from Umeda to Hirano and there's enough time to catch it at Shin-Osaka, bolt to Hirano and catch it again. Of course... this would be correct... if Umeda Freight Yard still existed. Little did I know that, whilst waiting at Shin Osaka station, the yard had been demolished some 3 years earlier!
The timetables I posted here were initially wrong. Wherever I had 'Umeda' should have actually been 'Osaka'. I thought 'Osaka' (from the freight train timetable) meant 'Umeda'... but it actually meant the yard right next to the Shinkansen depot out past Senrioka!
Shin-Osaka Station
I waited here for a while to see the freight head through to Umeda. Instead I got to see the standard array of express trains. Mixed in with these was a freight heading to Ajikawaguchi which caught me off-guard. You can find the timetables for Suita to Ajikawaguchi here.
The Ocean Arrow/Kuroshio in pictured above actually left 5 minutes late. That last picture shows the driver hanging out the front of the train with the stationmaster discussing something that was preventing him from leaving. What I didn't capture was the guard bolting down the platform with a few sheets of paper that must have been the timetable/run-sheet that you see paper-clipped in the cabin. It seems the driver was issued with the wrong one, as he swapped the one in the train with the one the guard delivered. The train then departed.
It was 30 minutes past the time that the train was meant to arrive and I decided to cut my losses. These trains are usually very close to clockwork and the Ajikawaguchi train had passed... so it was time to go.
Transit to Hirano
I took the Haruka Airport Express to Tennoji (thanks Rail Pass!) and then a local to Hirano. It was a quick trip. Of course, the goal was to pass the freight yard to see if there was any activity. Instead I was presented with the following...
I think I let out a big 'Ohhhhh....' at that point and had fellow passengers look oddly at me. Everything clicked. I was glad I'd left, but unhappy that I'd waited so long at Shin-Osaka. This is Japan... if the train doesn't arrive 5 minutes after schedule then move on.
Hirano Station
This is a little station on the line to Nara. I've posted the freight timetable for this yard here. It is located two stations east of Tennoji and you must take a local service on the Yamatoji Line to get there. The stop between Hirano and Tennoji is Tobushijomae and is located on the south-west corner of the freight yard I sought out. Stay on the left side of the train between these two stations and you'll get a good view of what's about to depart.
The yard has three staging roads immediately next to the passenger lines, but at ground level... the passenger lines are elevated. In these roads you'll find made up trains that have just been delivered, or are about to depart. Trains that arrive are staged here whilst either the engine that brought them runs around or the yard worker takes them away. There is a shunt road that runs right up beside Hirano station for this purpose.
I ventured out to Hirano on a Wednesday. As I passed the yard, I saw an EF66 about to carry out this very task. I got to the station in time to see it shunt right up next to the platform. It proceeded back into the yard and everything was quiet. There are occupation indicators line-side on the freight shunting roads that show you if anything is approaching. They'll flash if the track is occupied and stay lit if nothing is happening. Note that the flashing indicates that the road is in use. The train on the road may not come all the way up to the station. The points are situated a fair way back west and the shunting will only reach the station when long consists are being worked.
I followed the timetable and realised that there was an inbound freight due. From the city-bound platform, you can see the triangle to the east where the freight trains come from. It didn't take long before a freight came in, 5 minutes early. This was dragged through by an EF210. After this, there was nothing scheduled for a few hours... of course, I stupidly only looked at inbound traffic.
I was out of time and had to head back... completely failing to look at the outbound traffic timetable. As I left at 1pm on a local back to Tennoji, I passed an EF81 on its way to Suita. Totally pissed off, I was. EF81s are a favourite and I've taken a shot of one very similar to this one before... years before! In Umeda Yard! This poor old thing has been hanging around Osaka just waiting for me to return!
I returned to the apartment only to find that everyone else was still shopping... so... knowing that Hirano was 10 minutes from Tennoji, I ventured back to see the ~2pm services (one inbound and one outbound.)
An EF210 came in, 10 minutes early... and then the EF66 I'd seen earlier proceeded to Suita with a short rake of flats.
There was now nothing due until after 5pm, so I decided to call it a day and visit Den Den Town. I'd come back later to catch the EF81 in action.
Hirano Station, 2nd Attempt
My second attempt was carried out on a Friday. I based my plan around the 1pm depature of the EF81. Arriving at 12, I hoped to see at least one service... but absolutely nothing came through. The yard had zero workers and zero locomotives... just a few rakes of half-built consists. As I passed the yard on the way in I could see that nothing was happening, but I waited in vain anyway. Fail.
What was worse? The platform indicators were showing 'Pass' on the nearest platform to the yards. I'd not seen a pax go through here at all... so I sat, staring at the indicator... waiting for that "Train approaching" sign. Hours. Nothing. Oh well... they must program the slots in and not cancel them.
Hirano Station, 3rd Time Lucky
This time I attacked the station on a Monday. As I passed the yard on the local train, the EF81 was not there. It had been there waiting to depart the first time I'd visited and so I was worried. This time there were other locos in the yard, but none ready to head out.
I got to the station, parched. There was nothing due for about halfa so, despite the platform board showing a 'Pass', I ventured to the city-bound platform for a beverage. There are no vending machines on the outbound platform. Lo'and'behold, my favourite EF81 bolts past just as I'm on the other side, inserting coins. I leave half the coins inserted, grab the camera and got a few photos... school kids nearby were wondering why a photo was more important than a drink...I smiled.
Not to be fooled again.. I proceeded back to the outbound platform and caught the next freight coming in. Turns out there was also a young railfan there doing the exact same thing.
Passing time was easy... there was a local every so often and expresses interspersed.
And then it happened... the EF81 came through and the world was at peace.
Akihabara Washington Hotel
This is the first post of my most recent trip to Japan. It was the first time I'd been there in Summer and I was not expecting the weather to be so damn nice. Yes, humid, slightly, but not quite tropical-humid... somewhere half-way towards out-back humid.
Anyway, the trip started in Tokyo. I usually stay on the west-side of the Yamanote Line, but this time I stayed east. Akihabara to be exact. The good thing about the east side? The Shinkansen lines run on this side, terminating at Tokyo Station.
Akihabara is north of Tokyo, so only the 'northward' Shinkansen run through. Well, the north-west-ward also run through too now. Fortunately, the shinkansen tracks are all above ground until just after Akihabara station, so there are several vantage points if you search for them.
One vantage point is the Akihabara Washington Hotel. It is actually so well known for it that they have an actual room dedicated to trains; including a model railway! (Note the single bed.)
Checking in
When booking the hotel, I left a comment requesting a room that could see the Shinkansen. I received an email response saying that this was not a problem. Upon check-in, I neglected to remind them and was first given a room staring into another office building to the south.
I returned to the counter and politely asked if my comment still existed and if there was any chance of a room looking over the tracks. The receptionists kindly oblidged... although I did hear a snicker between the two girls that the "gaikokujin ha densha wo mitai, heya kara." I couldn't tell if it was my bad Japanese or if I was a train nerd.
Room with a view
Second time lucky! The room had a great view of the Kanda River and a shrine on the opposite bank. To the right were the Shinkansen tracks heading to Tokyo. There is also an elevated flyover of the Ueno-Tokyo Line.
From here ... it's going to just be pictures. There's a vending machine on every floor... so a few beers and a bit of train watching was had.
Stay here, it's awesome. Just remember to check that your room has a view!
Simple Short Circuit Protection
My vintage power supply from Japan did not have short-circuit protection. I couldn't deal with this, as the brass models were also ancient and shorting out all over the shop. A little googling presented me with Homemade Circuit Projects: Short Circuit Protection. This article has a nice 'mechanical' short-circuit protector. A relay is energised to begin the power output and, on short, is tripped, cutting the supply.
There are no integrated circuits whatsoever inside this power supply, so I thought I'd go the mechanical way.
The circuit
 A relay is used to allow power from the source to the output. This relay is initially de-energised. The momentary push-button, when activated, will provide power across the coil in the relay, energising it. There is a secondary feed to the relay's coil which goes via its switched output. As the relay switches, this secondary power is activated and the current then also flows across the coil. This provides a sort of infinite loop where the power through the relay contacts infact keeps the relay energised.
A short on the output causes a drop in voltage. This voltage is required to keep the relay energised, so a drop will actually de-energise the relay and cut the output power. The push-button will need to be activated once more to re-energise the relay.
Circuit placement inside the power supply
This circuit needs to be placed after the bridge rectifier as it requires DC power. It also needs to be placed prior to the direction switch, as the polarity needs to be constant and one-way around. This leaves us with the choice of putting it before or after the throttle potentiometer.
I had originally placed it between the rectifier and the potentiometer. I wanted the continuous voltage, otherwise I'd only be able to energise once the throttle was more than zero. Unfortunately, in this position I found that it only tripped when the throttle was at maximum. It seemed that the potentiometer was capable of absorbing the short if any resistance was provided. Prolonged exposure to a short would no-doubt heat the coil of the potentiometer and cook it.
Moving it to the other side of the throttle worked perfectly. Even at throttle setting '1' it would trip. Of course, it would only energise when on throttle '1' or higher. I considered adding more components to allow a secondary source to trigger the relay, but found that I could adjust my usage of the power pack. Now when wanting to drive trains, one must shift to low throttle, hit the trip switch and then throttle further.
Required Components
Based on the diagram above, you'll need 2 100uf electrolytic capacitors at 16v or higher, a diode capable of the amperage/voltage, and a relay. The relay should be DPDT if you also want the status light.
As above, you can twist the diodes together in parallel to make them suffer higher currents. I used 1A diodes and wanted to make sure they could cope with the 2A transformer... but then I got bored and twisted 4 of them together. You can then see my prototype hookup to see if it all worked.
Status Light
I wanted to know when the switch was in trip mode. I didn't want to have to pull my multimeter out each time to work out where a fault was when no power was available. To do this, I used the second side of the relay to provide a 12v source to the led inside the momentary switch. This would light in the normally-closed position. As mentioned above, the relay only provided output power when energised (Normally-Open), so I wanted the light on the NC side so as to illuminate when the power was cut off.
The switch indicated that it was rated at 12-volt and 240v. I took this to mean the internal lamp/LED? was 12v and the contacts could switch 240v. I didn't want to risk it though, so I put a 470ohm relay in series to limit the current. The resulting brightness worked perfectly well.
Case Modifications
Adding the switch wasn't going to be easy. The nicest one I could find had a huge barrel. I used the smallest drill-bit I could find and then proceeded up. I hate cutting in to metal... always worried something will go flying and take a limb off. The metal shavings aren't much fun either.
Fortunately my friend has a dremel... so we hacked away with that and made the switch fit. The best location was on the front panel. I do like the finish.
End result
It works perfectly. Setting the throttle to '1' or higher lights the switch... it always starts in trip mode and needs to be activated. Pressing the button switches modes and the relay clicks. The LED switches off and, depending on the position of the direction switch (and the power requirements of the locomotive on the track) the locomotive will start to move.
In fact, it shorted as soon as I tried to apply power to my ED100 on the test track. Turns out an axle had dislodged from its mount hole in the bogie frame and was happily shorting. After a realignment, all worked well. The bogies on these Tenshodo/KTM models have quite a bit of flex. The lateral screw isn't 100% tight and so the bogie frames can skew.
Vintage IMAI.S.S. Power Supply Voltage Conversion
I've recently returned from Japan and have brought a loot with me. Whilst in Tokyo, there was the annual Antiques Jamboree at Odaiba and I happened across a box of HO KTM brass that I could not refuse.
This set included a lot of track, two powered locomotives, rolling stock and a power supply. Thanks to the age of the kit, the power supply was 110v only. Preliminary testing in my Tokyo hotel proved that everything was in fantastic working order. I assume this box has been in someone's cupboard for quite a while.
Don't plug anything rated at 110v into Australian sockets
You don't want to try this at home. Our powerpoints are more than double the voltage of that in Japan... I wonder if this explains why we have a ground line. Either way, any Japanese equipment that is not dual-voltage will bake if you plug it in. This beautiful old transformer would never handle it's new home.
I had the option of chaining in a power converter, but this would have been tedious. In fact, this is my first 110-only product and I would've needed to purchase a step-down transformer. Instead I chose to pull the thing apart and replace the transformer.
What were you expecting? Integrated Circuits?
I opened up the power supply and felt that I'd opened a treasure chest. I could pick out the potentiometer for the throttle, the switch for the direction and the transformer. The final component needed to be a bridge rectifier to convert the AC to DC, but it ... didn't look like one at all.
Following the wires, it seemed that there were 5 contacts on the device I assumed was the rectifier. A little googling informed me that this is a vintage metal rectifier with selenium insulation acting as the diodes. Very cool actually.
Purchasing a replacement transformer
Jaycar is my local electronics store of choice (if not the last available store in Australian cities) and perusing their site came up with a valid substitute.
There were quite a few to choose from, actually. As the amperage went up, so did the weight. I assume the copper coil mass dictates how much current the transformer can deal with.
Transformer transplant
This all went quite swimmingly. The existing wiring was labelled for safety-sake.
It turns out that the 110v input wires were hardly twisted and taped together. I would hope that this wasn't an original factory job... but as far as I know this is a Japanese brand and this should have been the original factory plug. Quite interesting... let alone dangerous.
Once the 110v transformer was out, the new transformer was soldered and then bolted in.
It just fit. I mean.. a few millimeters more and we would've had to determine if Jaycar does returns.
The 240v feeder was passed in and the wires were heatshrinked, the rest were soldered in place as per the previous construction.
Plugging it in...
With breath held, I plugged the transformer into the power board. It worked. The light lit dimly and no smoke came out.
I rigged up a quick test track from the box of treasure purchased in Japan and tested the KTM ED100 that also came with it. After a little wheel and track cleaning the locomotive started bolting along.
Success! This transformer is solid... although has zero short-circuit protection! Smoke started to appear during a motor short.. but I couldn't determine the source... I'll make bloody well sure in the future that shorts don't last too long.
The directional switch is momentary unless you force it to either extremity. This is a nice touch as you can set your speed and then pulse the direction as required.
After running my brass EF62, I found a screw left on the track... the downfall of brass locomotives is that they're bound to shake things loose eventually!
I was nothing short of ecstatic to have found this box at the antique fair in Tokyo.
Tokyo Freight: Shinjuku Station
So you're in the big smoke for the day and want to see a freight train? The best advice I can give you is to head on over to Minamisenju as Shinjuku sees very little activity. On the off chance you can't do this, please refer to the table below.
Timetables
The timetable covering Shinjuku station incorporates two paths through Tokyo. The major path is the branch to Sumidagawa Freight Terminal (aka Minamisenju) and secondly the less-busy line through Shinjuku Station to Shin-Tsurumi yard. It seems that trains choose a path south from Omiya and split at Tabata Station to either destination.
I'll just cover the freight through Shinjuku for now.
| Southbound | Omiya | Tabata | Shinjuku | Shintsurumi | ||
|---|---|---|---|---|---|---|
| Service | Origin | Depart | Pass | Pass | Arrive | Comments |
| ▲3080 ~ (▲3071) | Sapporo | 0205 | 0226 | 0254 | 0314 | ▲ = X間-Y間 月曜日運休 (Not Mondays between Aomori[Junction]-West Hamamatsu) |
| 3086 ~ (3075) ~ (3073) | Sapporo | 1135 | 1152 | 1212 | 1227 | |
| 4070 ~ (5072) | Sendai | 0214 | 0236 | 0256 | 0326 | |
| 8086 | Sumidagawa | !! | 1449 | 1509 | 1528 | !! = Starts at Sumidagawa at 1402 to Tabata by 1410. |
| 8572 | Utsunomiya | 0209 | 0231 | 0251 | 0320 | |
| 8588 | Utsunomiya | 0454 | 0512 | 0532 | 0554 |
| Northbound | Shintsurumi | Shinjuku | Tabata | Omiya | ||
|---|---|---|---|---|---|---|
| Service | Origin | Depart | Pass | Pass | Arrive | Comments |
| (▲3070) ~ ▲3081 | West Hamamatsu | 0246 | 0301 | 0321 | 0340 | ▲ = 日曜日運休 (Not Sundays) |
| (3090) ~ (5090) ~ 4081 | Nagoya | 0227 | 0249 | 0309 | 0334 | |
| (96) ~ (5096) ~ 4083 | Nagoya | 0446 | 0502 | 0522 | 0543 | |
| 8089 | Yokohama Hazawa | 1528 | 1551 | 1611 | !! | Proceeds to Sumidagawa at 1743 after Tabata. NOT Omiya. |
| 8171 | Kawasaki | 0300 | 0320 | 0340 | 0407 | |
| 8585 | Kawasaki | 0515 | 0532 | 0552 | 0618 |
Osaka Freight: Suita to Ajikawaguchi (Super Rail Cargo)
This line is an extension of the Suita to Umeda freight/express-train line that runs from Shin-Osaka Station to the Umeda Freight Yards.
This line continues further south-west, rising back up to the height of the kanjosen and then branching off on the Yumesaki Line to Universal Studios Japan. Before this though, is Ajikawaguchi freight yards. The home of Sagawa Transport's M250!
This freight train is famous... it's actually an EMU high-speed express freight service that runs through the night to get your urgent deliveries to Tokyo. The opposing service departs Tokyo at the same time and they pass somewhere half-way along the Tokaido Main Line in the middle of the night.
Due to its timetable, you'll really only ever see it resting in the Ajikawaguchi yard. Sometimes I've seen it photographed in the early morning at the Tokyo end, but never really in daylight when moving.
Due to this, I still haven't managed to properly photograph this train. I've seen it depart Ajikawaguchi once and you can find a post with a movie of the departure over here.
Rail-set Train
The last column on each table is a rail-set train. I've seen this pass before from an assortment of locations.
Ajikawaguchi
This area is difficult to photograph, but there is a large level crossing on which you can gently walk into the middle of and take photos. Just be very considerate and respect the requests of staff if they ask you to get out of the way!
Timetables
As per previous Osaka timetables, all times are up until Suita. I'll look into extending the SRC through to Tokyo at a later date.
| Southbound | Suita | Ajikawaguchi | |||
|---|---|---|---|---|---|
| Service | Origin | Arrive | Depart | Arrive | Comments |
| ▲51 | Tokyo | –– | 0511 | 0526 | ▲ = 日曜日運休 (Not Sundays) |
| ▲59 | Tokyo | –– | 0451 | 0510 | ▲ = 土 or 休日運休 (Not Saturdays or Holidays) |
| (4078) ~ (1081) ~ 91 | Sendai | ºº0723 | 0833 | 0900 | ºº = ?? |
| ▲93 | Osaka | 1102 | 1111 | 1157 | ▲ = 月曜日運休 (Not Mondays) |
| (1881) ~ 1883 | Kyoto | 1447 | 1603 | 1628 | Rail-set or 'other' cargo. |
| Northbound | Ajikawaguchi | Suita | |||
|---|---|---|---|---|---|
| Service | Depart | Arrive | Depart | Destination | Comments |
| ▲50 | 2309 | –– | 2324 | Tokyo | ▲ = 日曜日運休 (Not Sundays) |
| ▲58 | 2259 | 2320 | 2328 | Tokyo | ▲ = 土 or 休日運休 (Not Saturdays or Holidays) |
| ▲90 | 1703 | 1739 | 1742 | Osaka | ▲ = 日曜日運休 (Not Sundays) |
| 5088 ~ (3089) | 1818 | ºº1851 | 1944 | Sendai | ºº = ?? |
| 1180 ~ (1182) | 1040 | ºº1127 | 1225 | Kyoto | ºº = ?? Rail train or 'other' cargo. |
I will go back and get the Super Rail Cargo once more!
Kyoto City Tram (WWII Era Japanese City Maps)
Did you know that Kyoto used to have an extensive street-car network? I sure-as-hell didn't and was very happy to find out. This all started due to the post: Early Showa period Kitakyushu tram on JNSForums. Yes, the post describes Kita-Kyushu... well west of Kyoto, but further down Kitayama-san posted the link to the US WWII Military Maps. My eyes then opened wider than before...
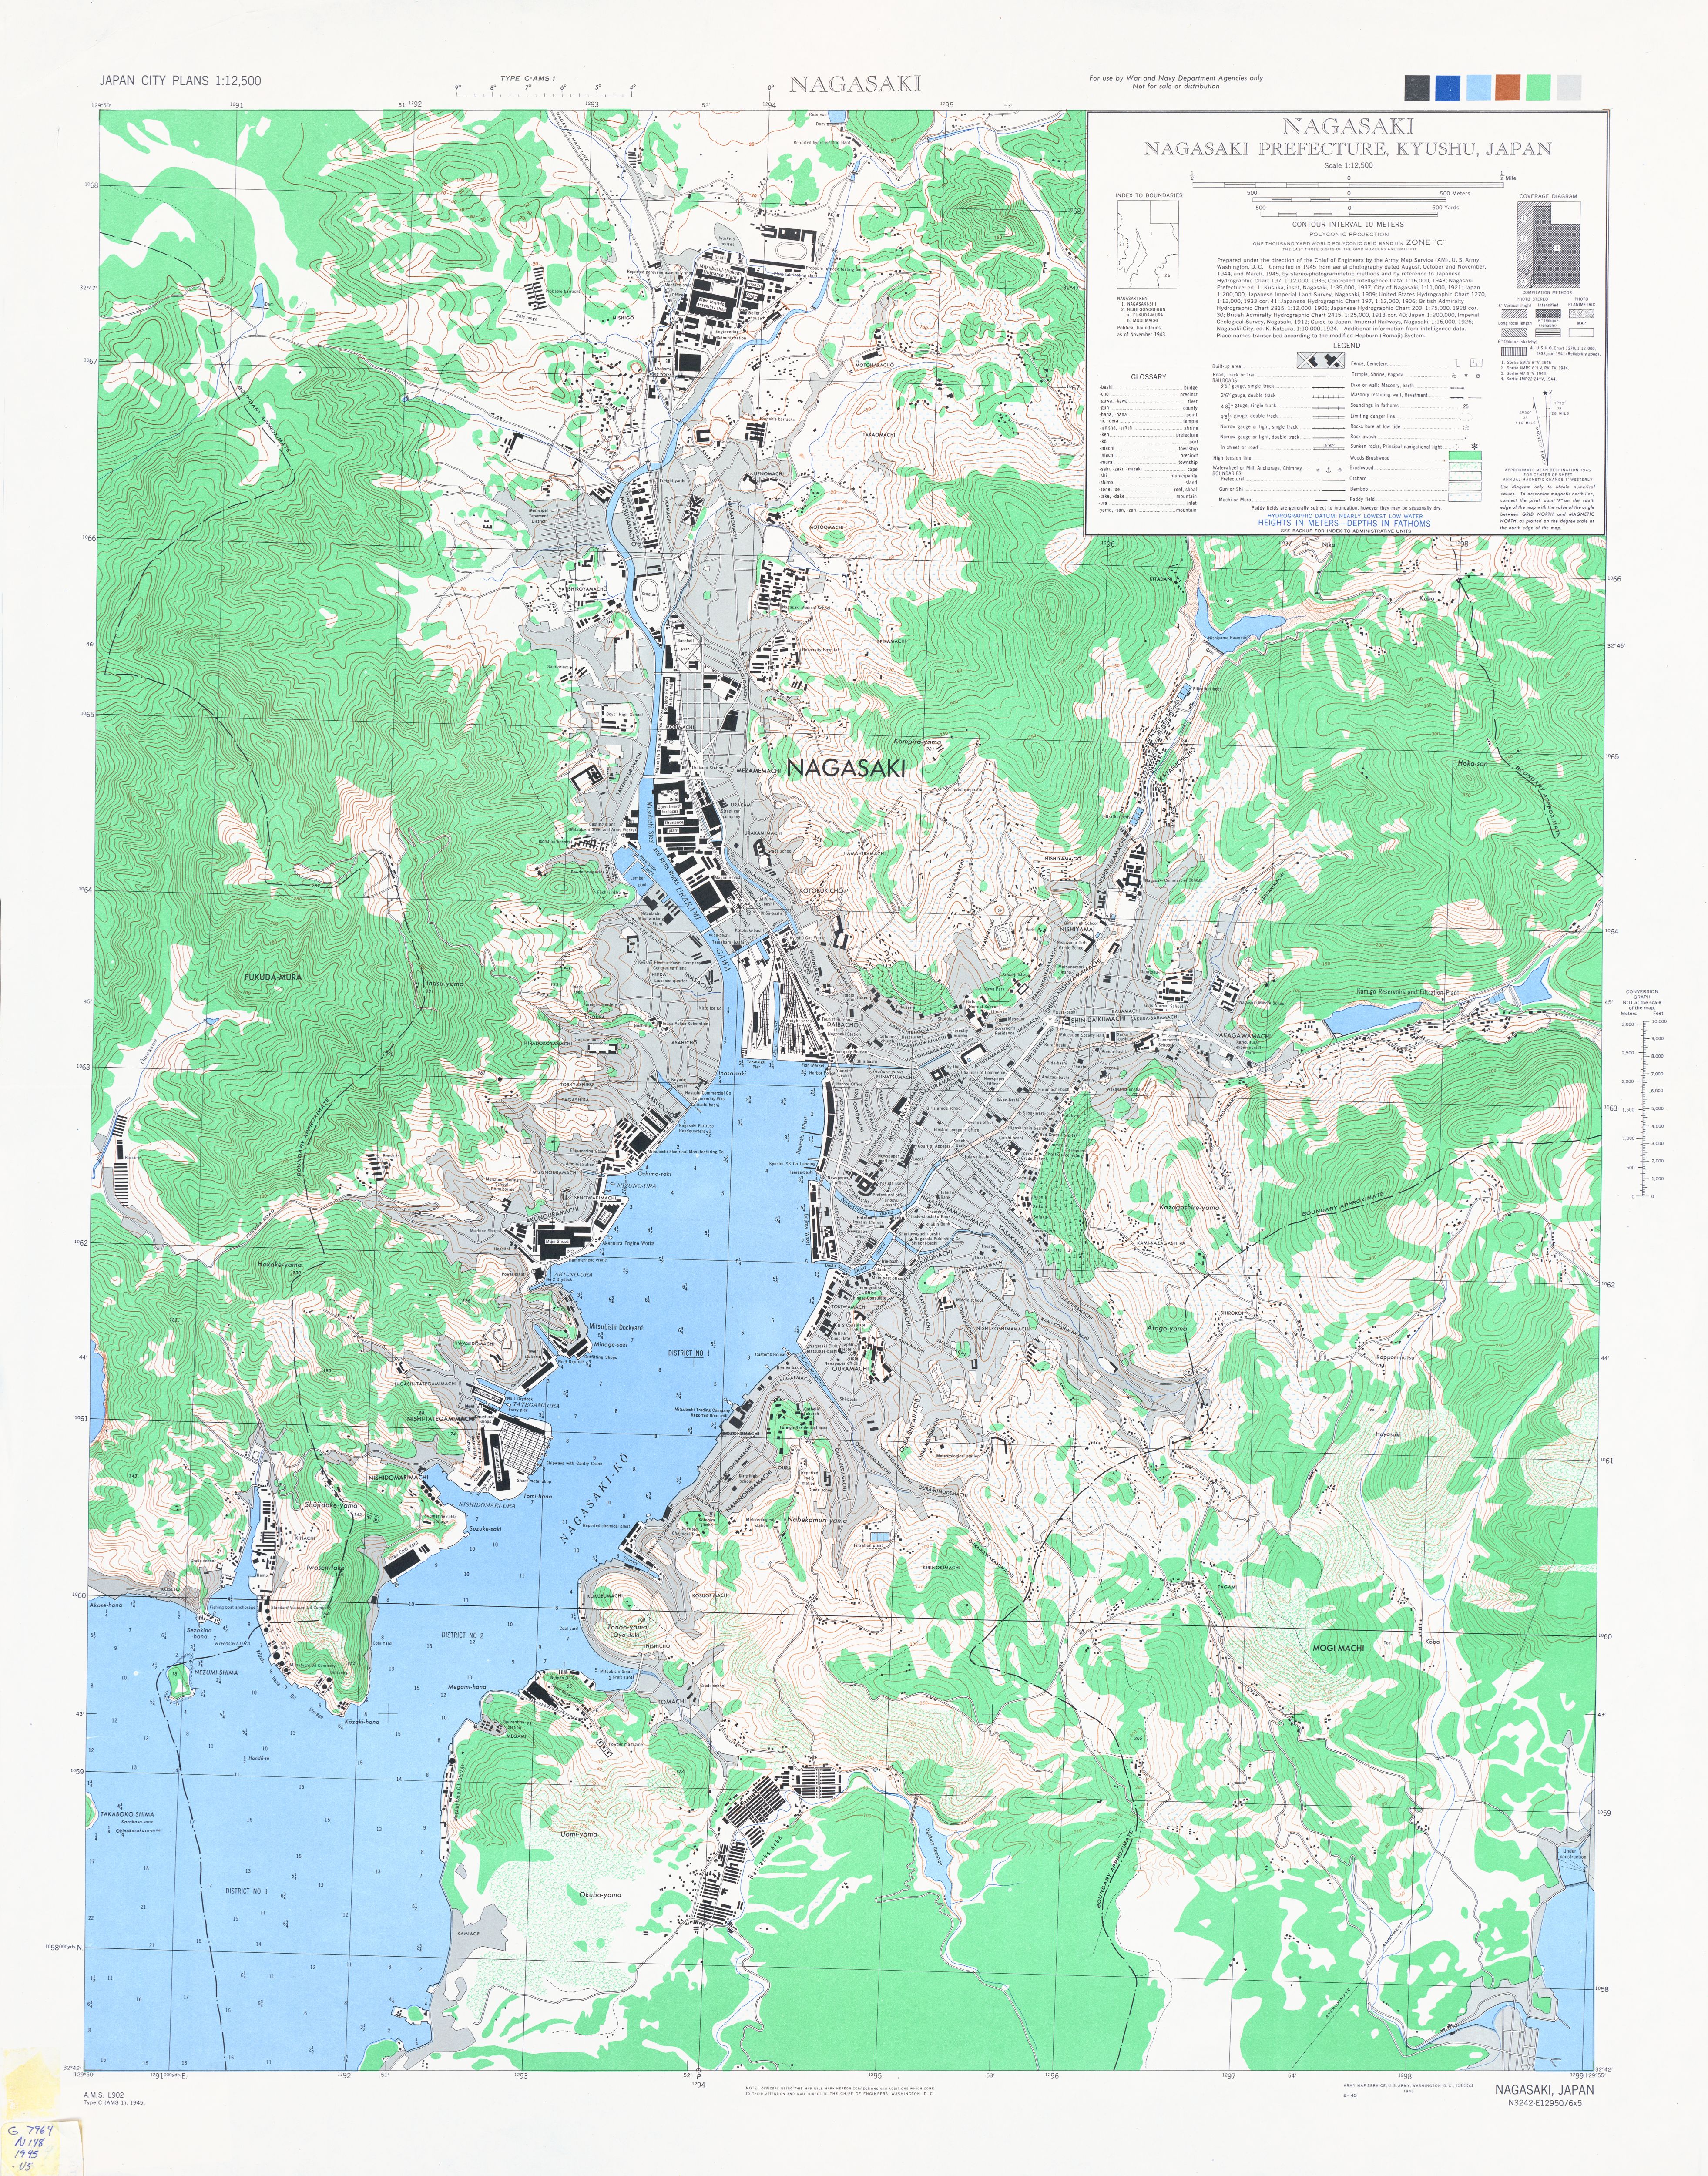
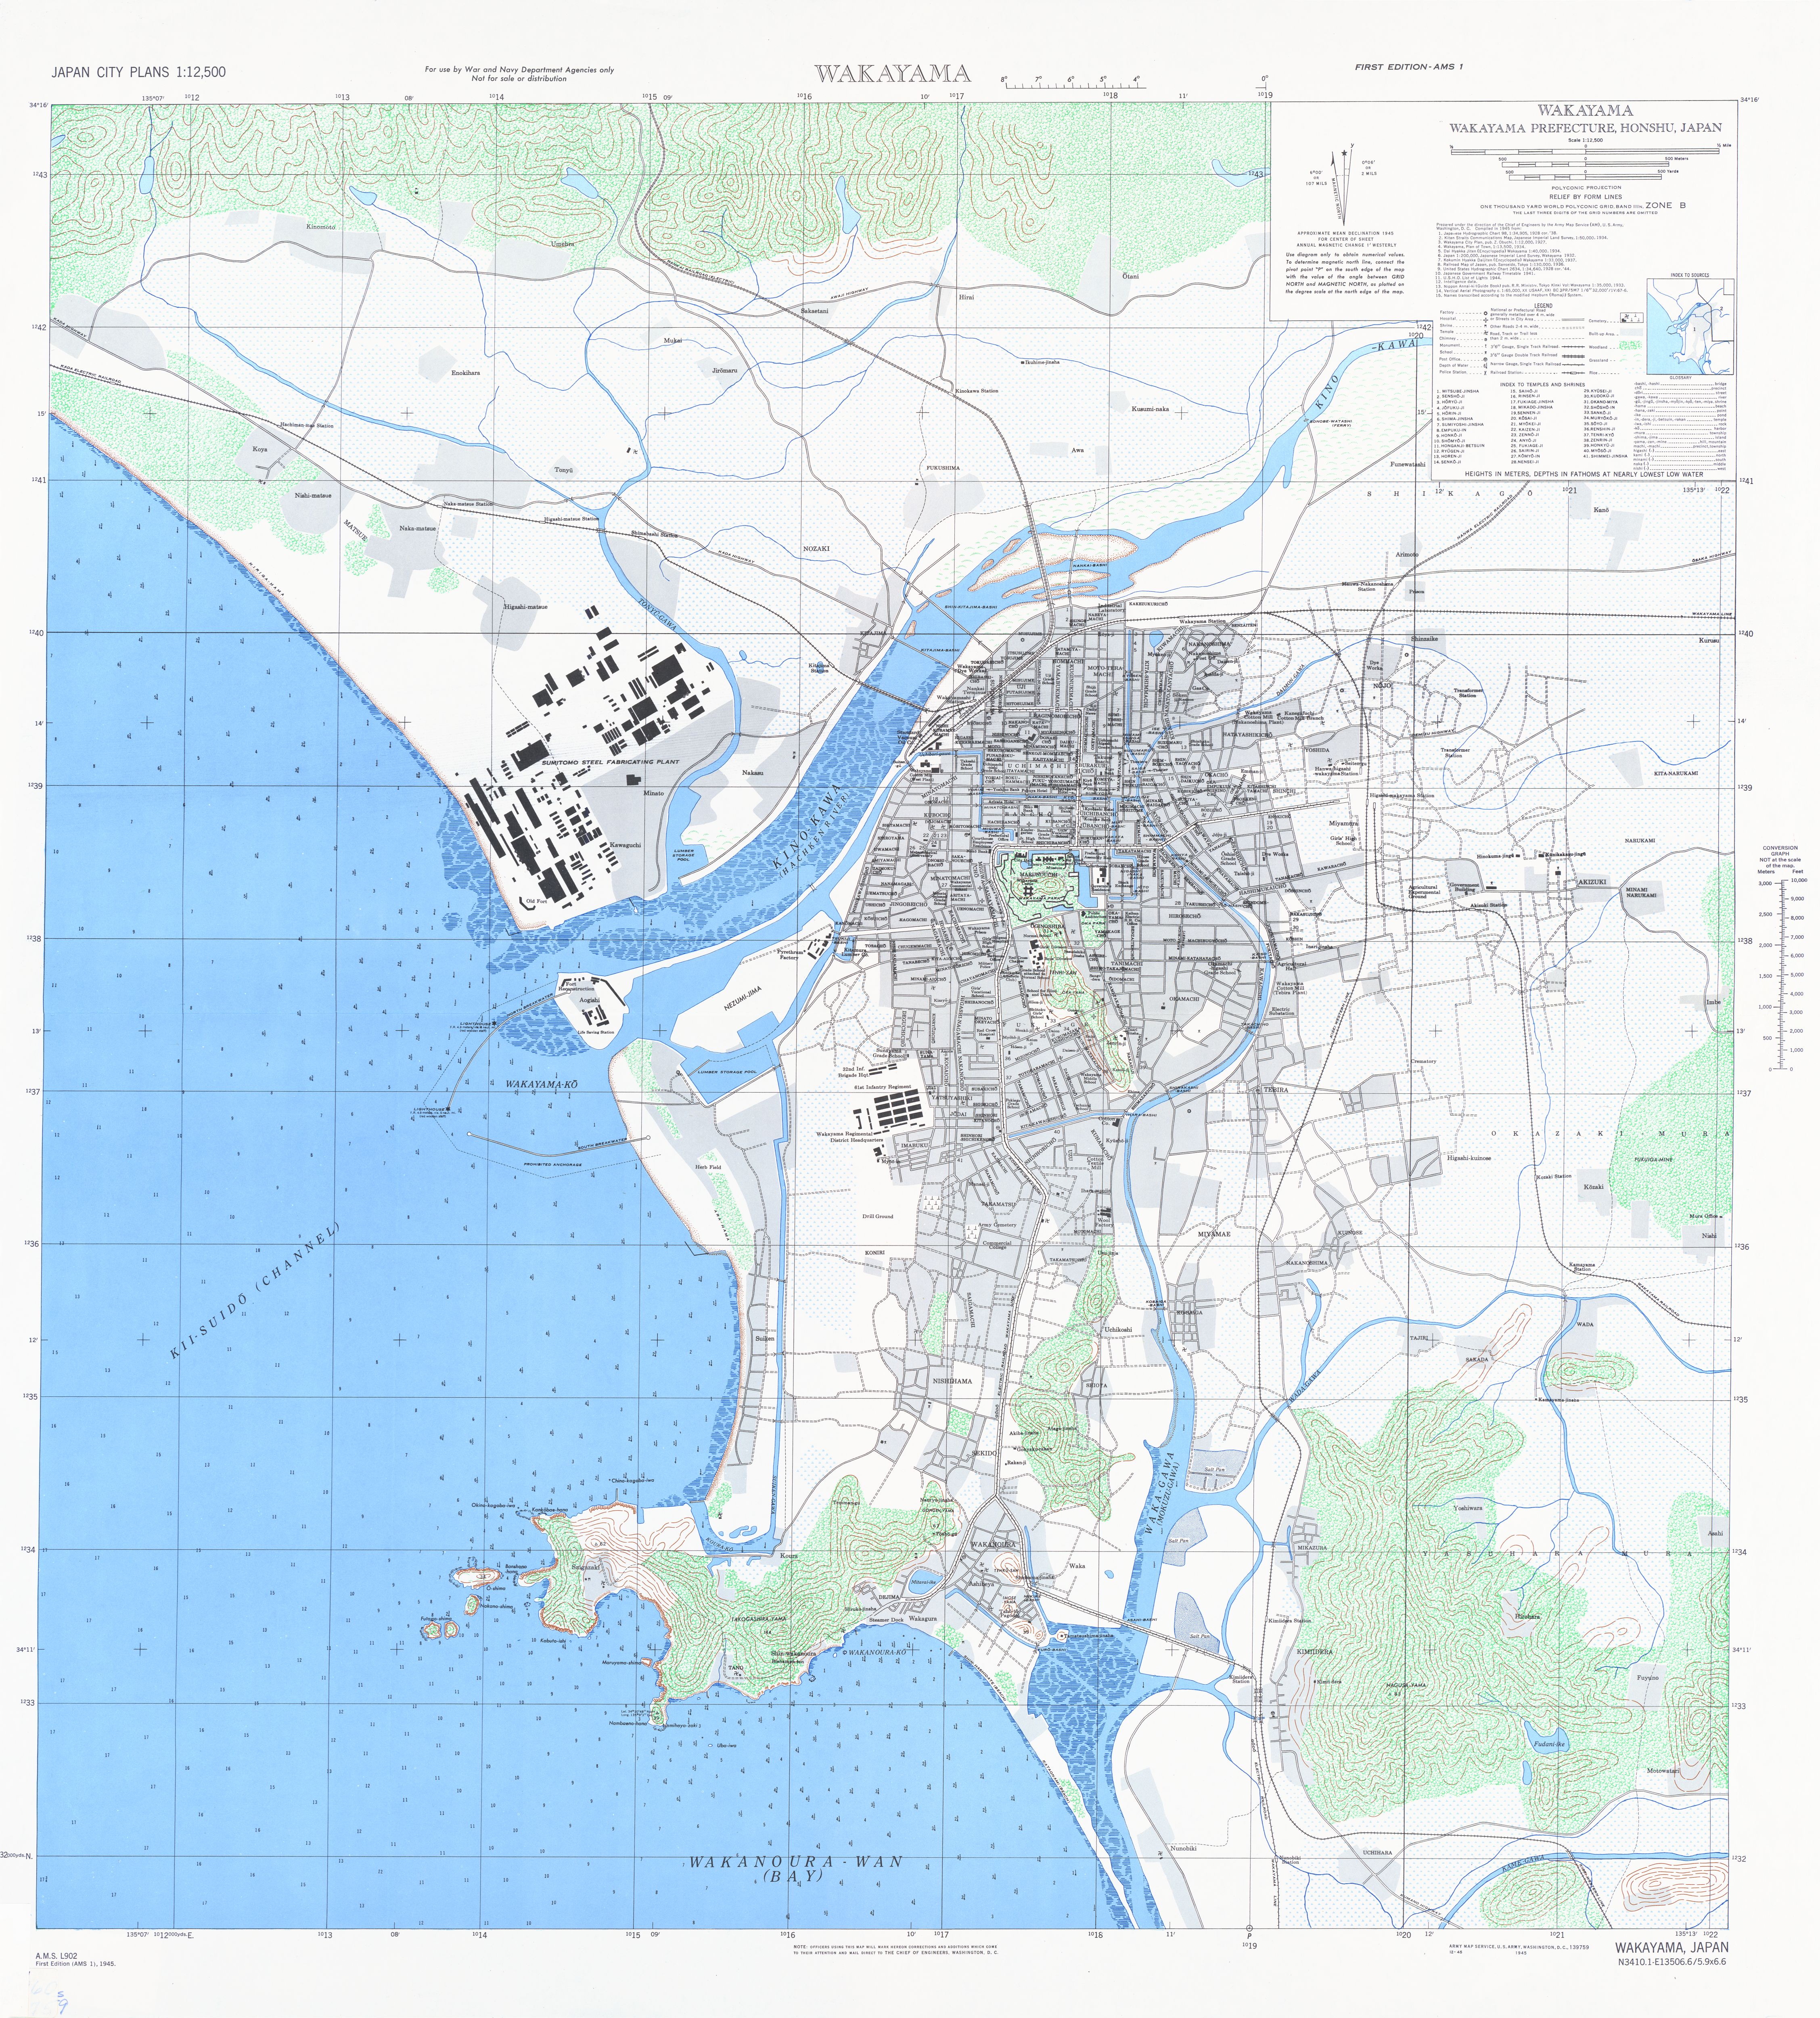
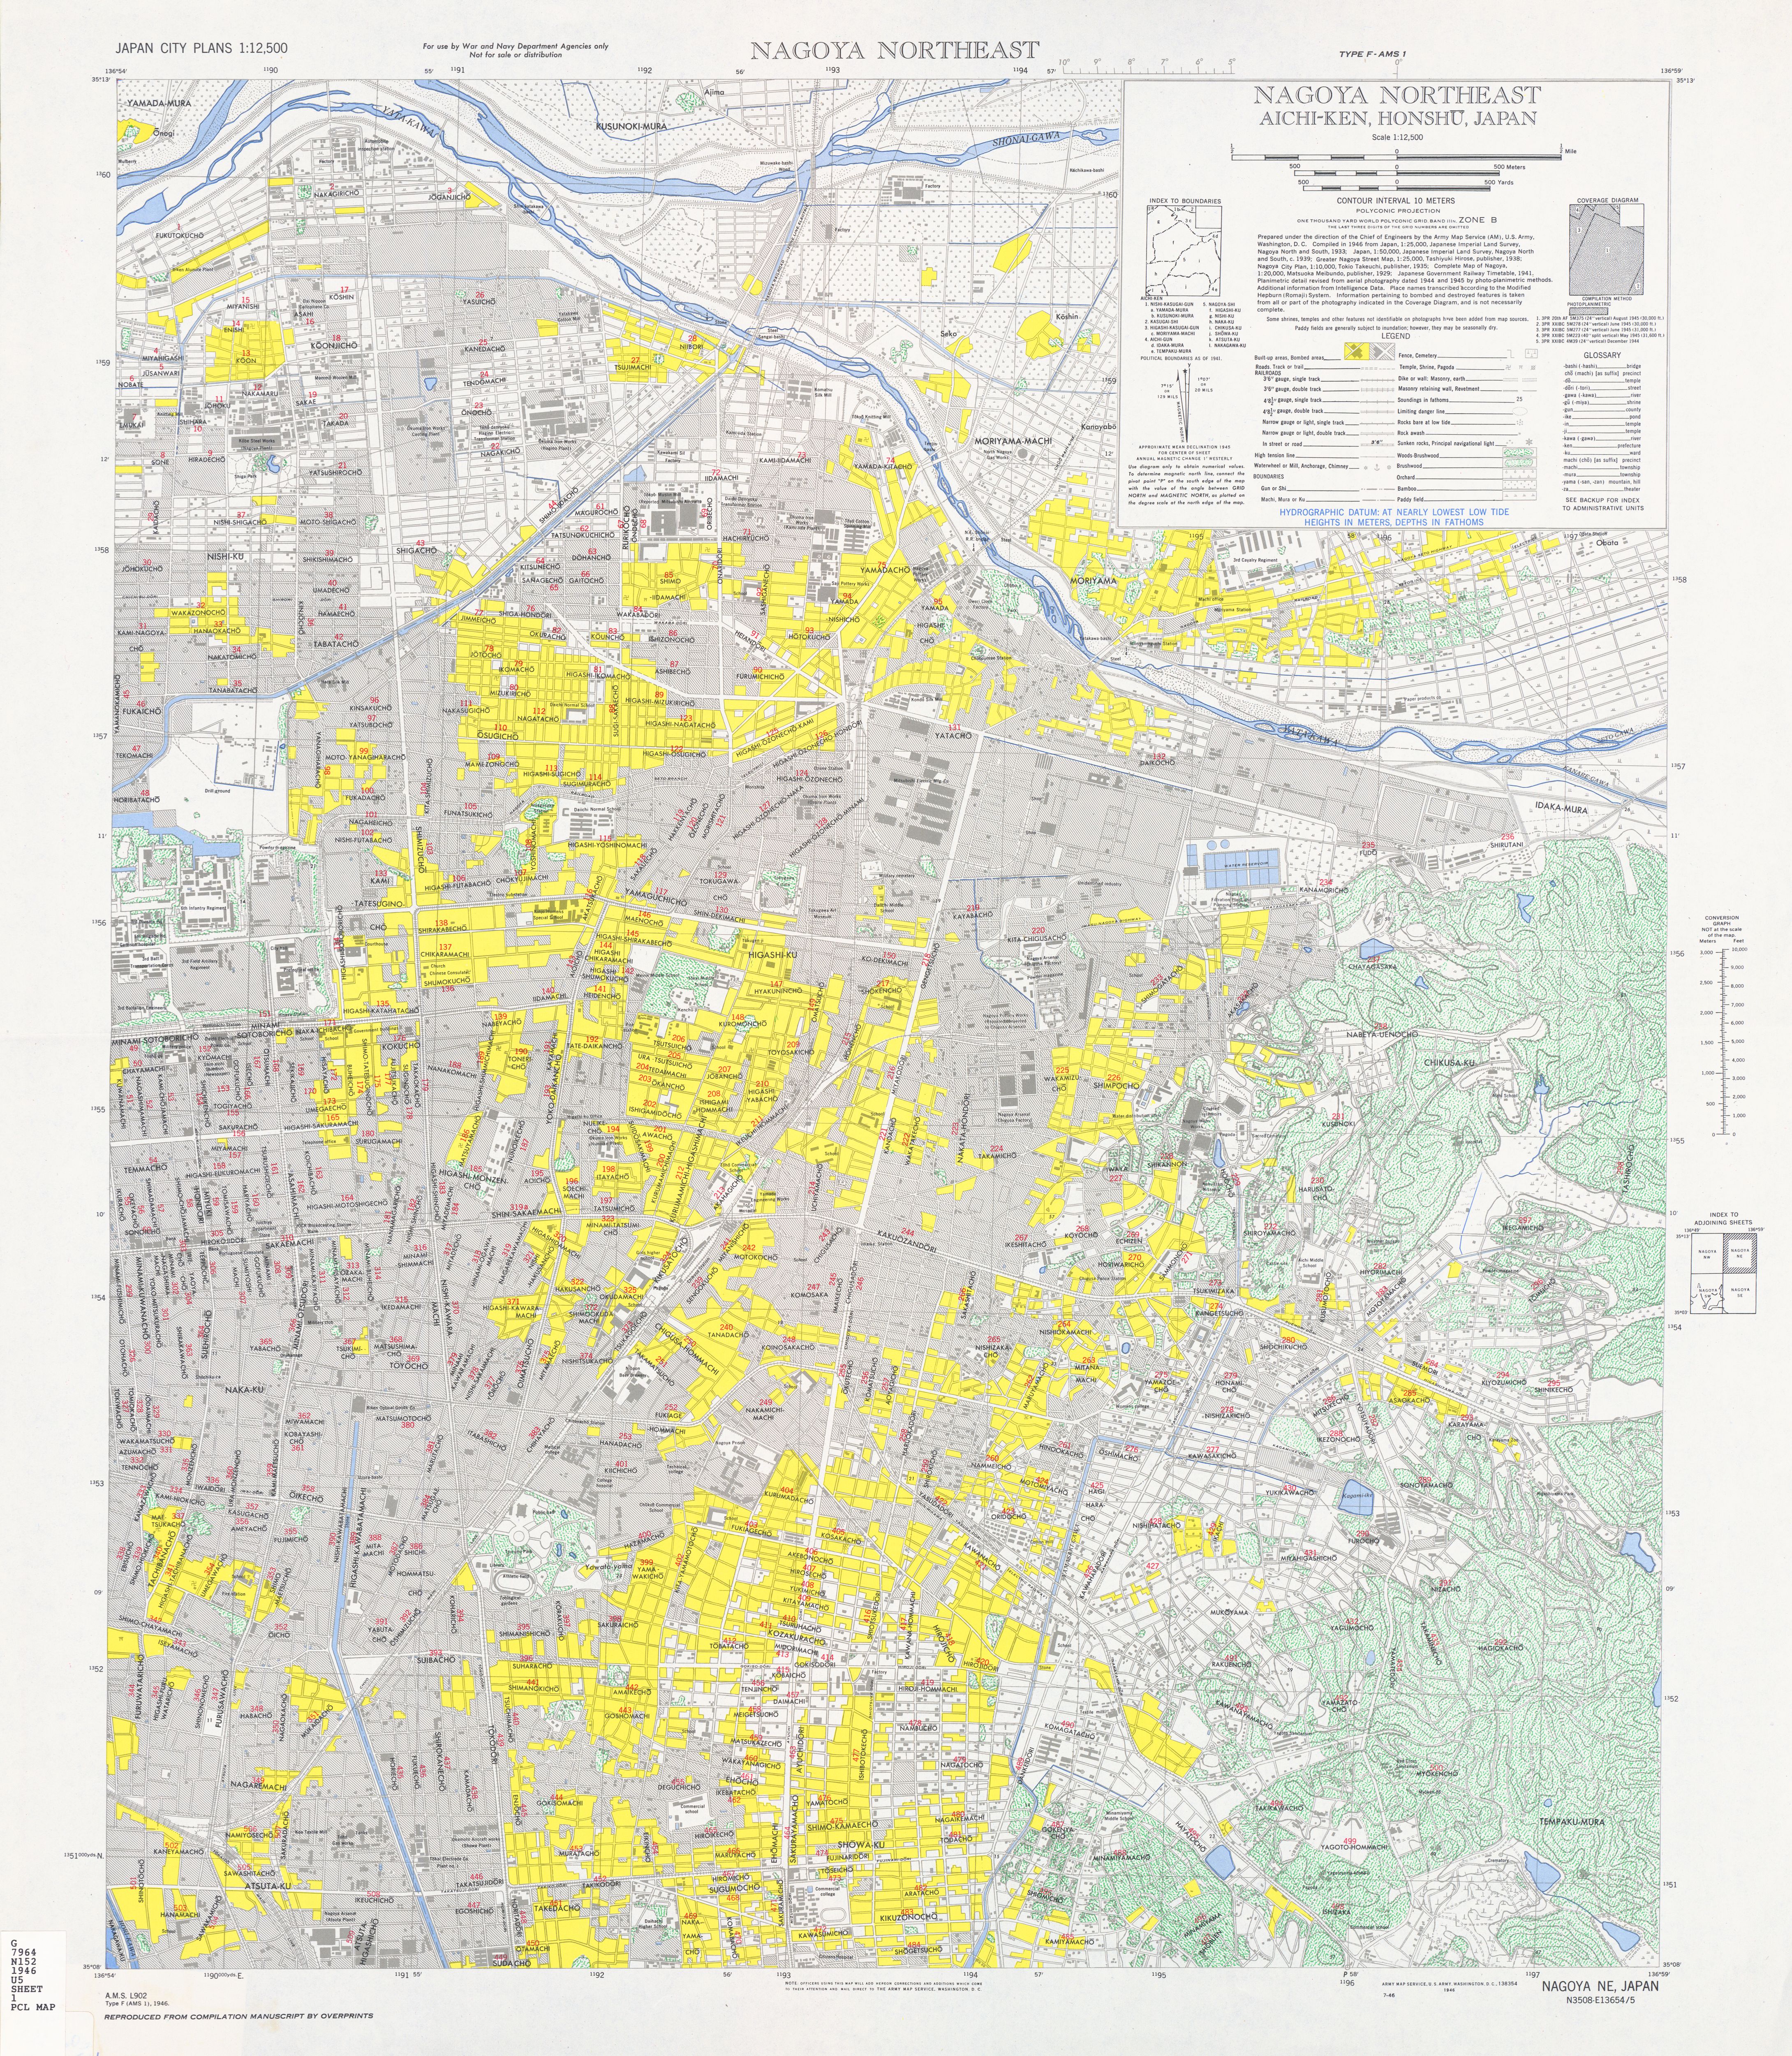
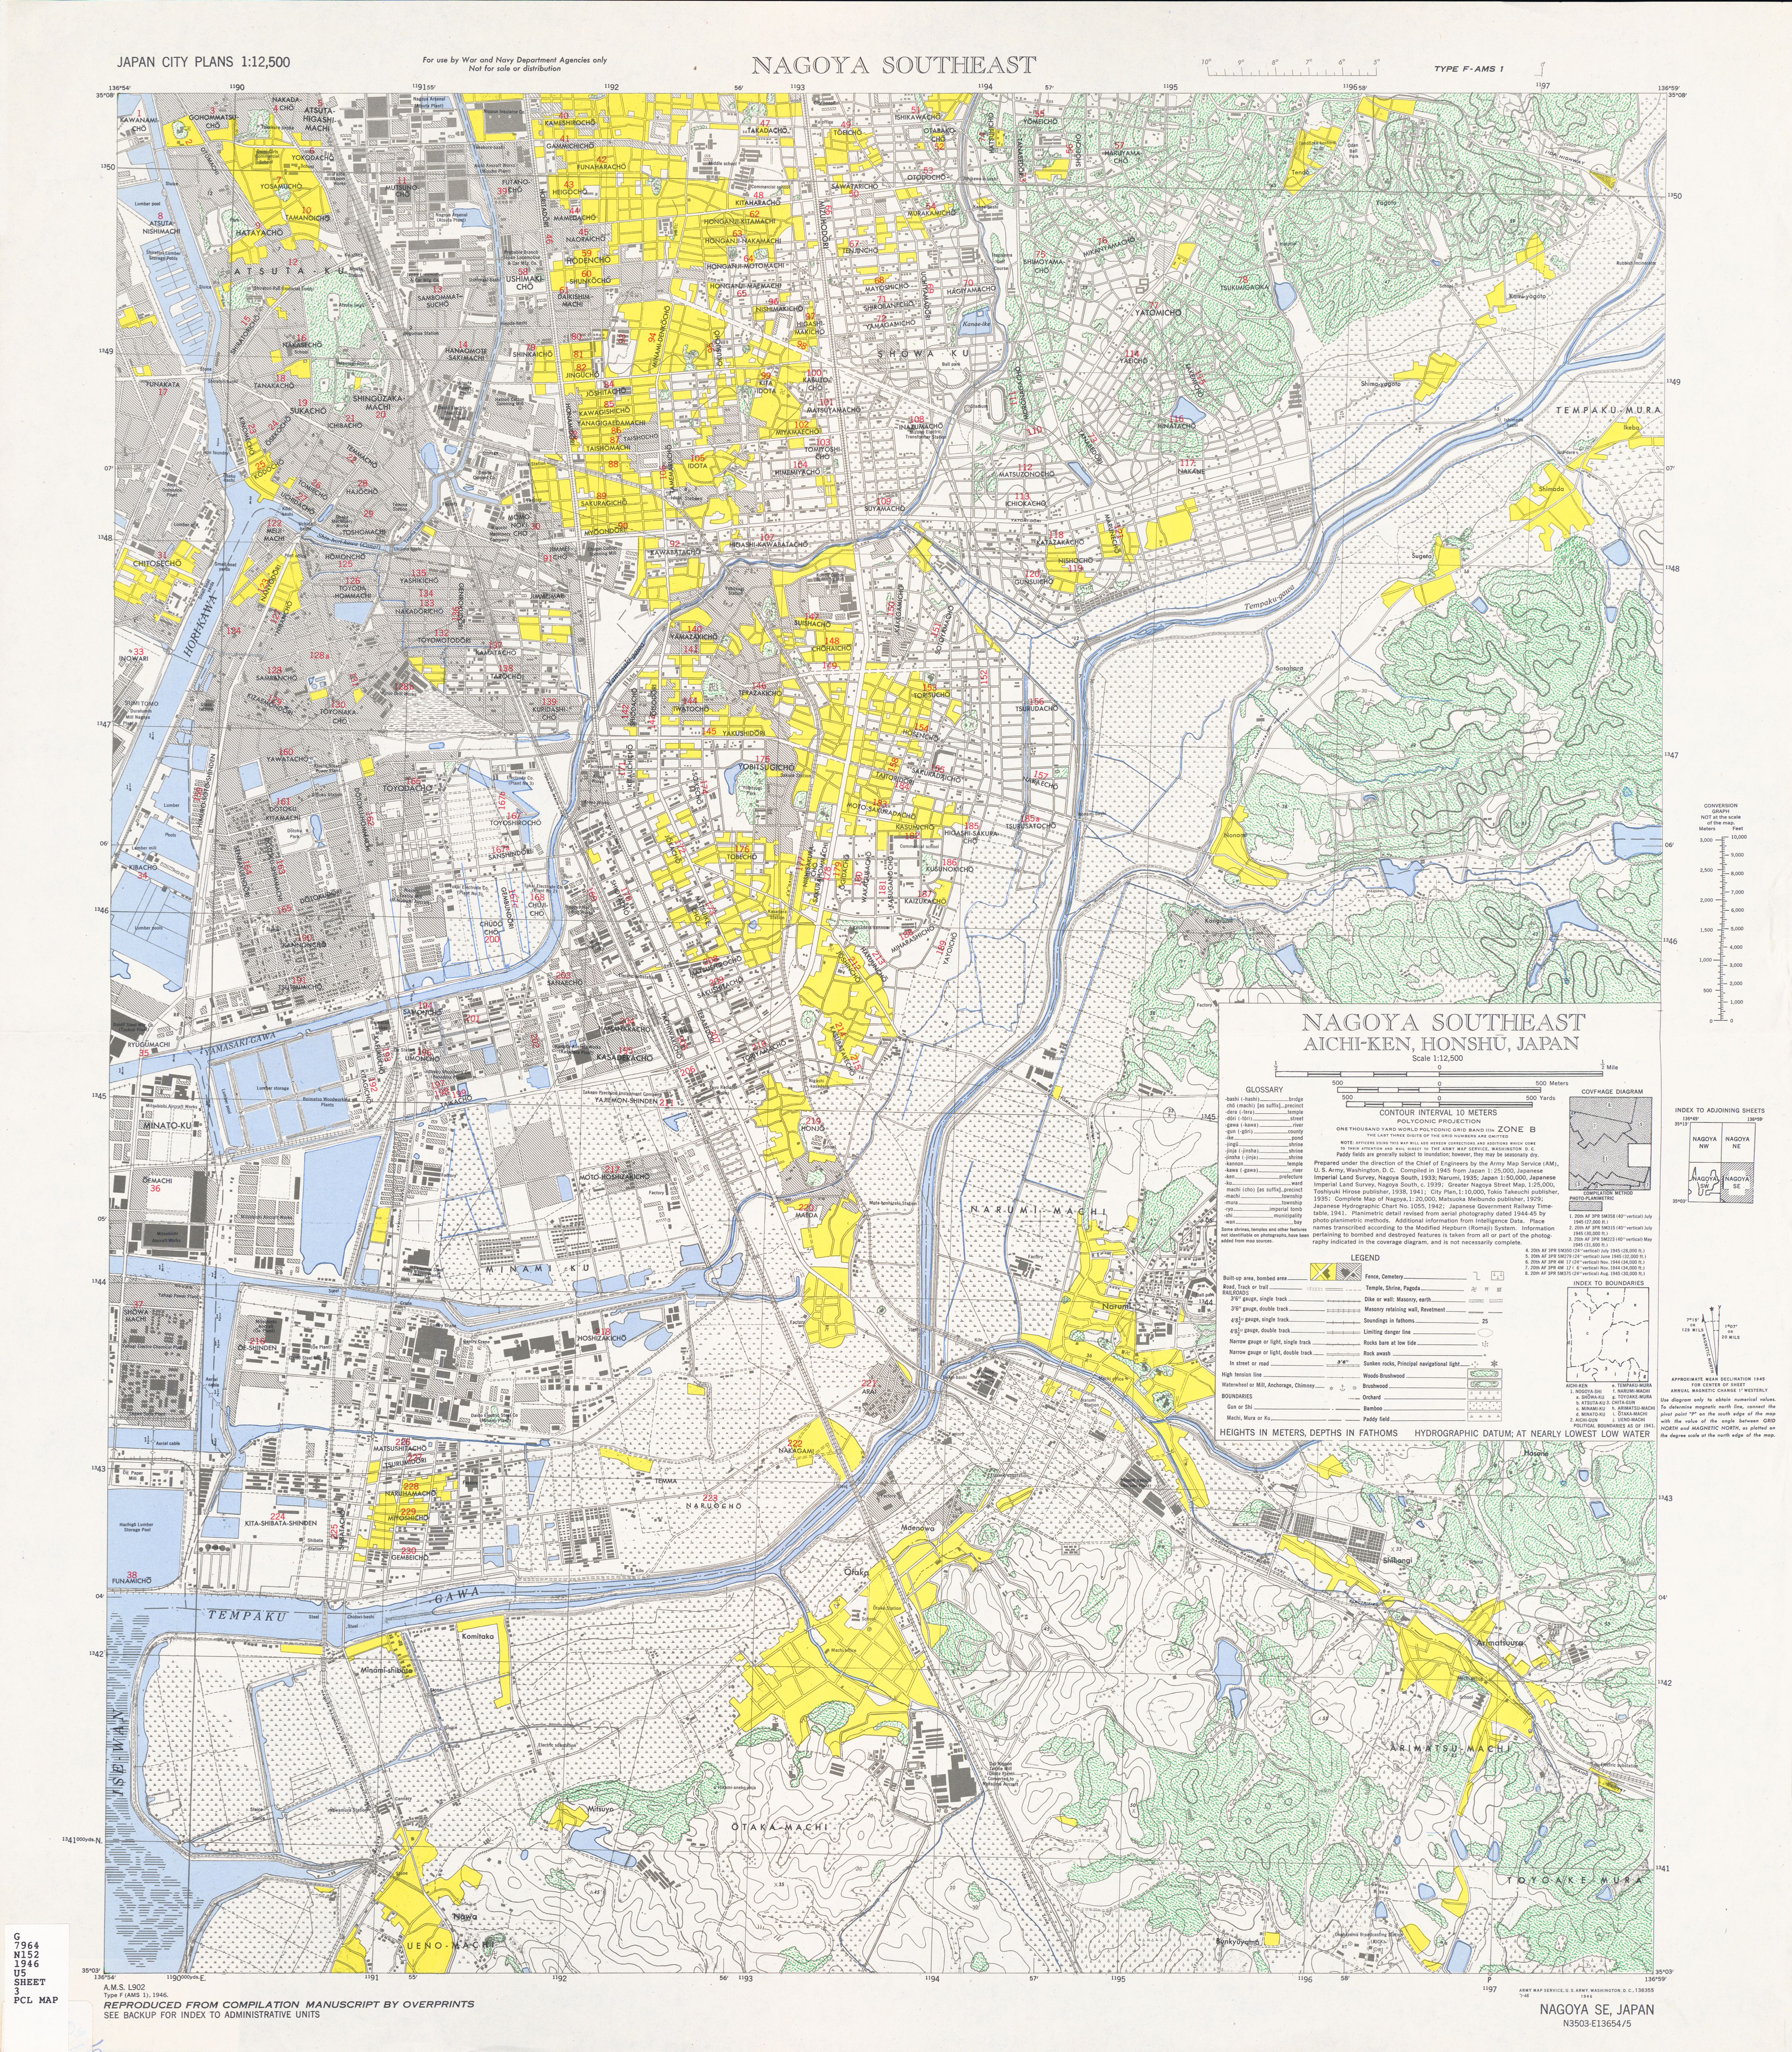
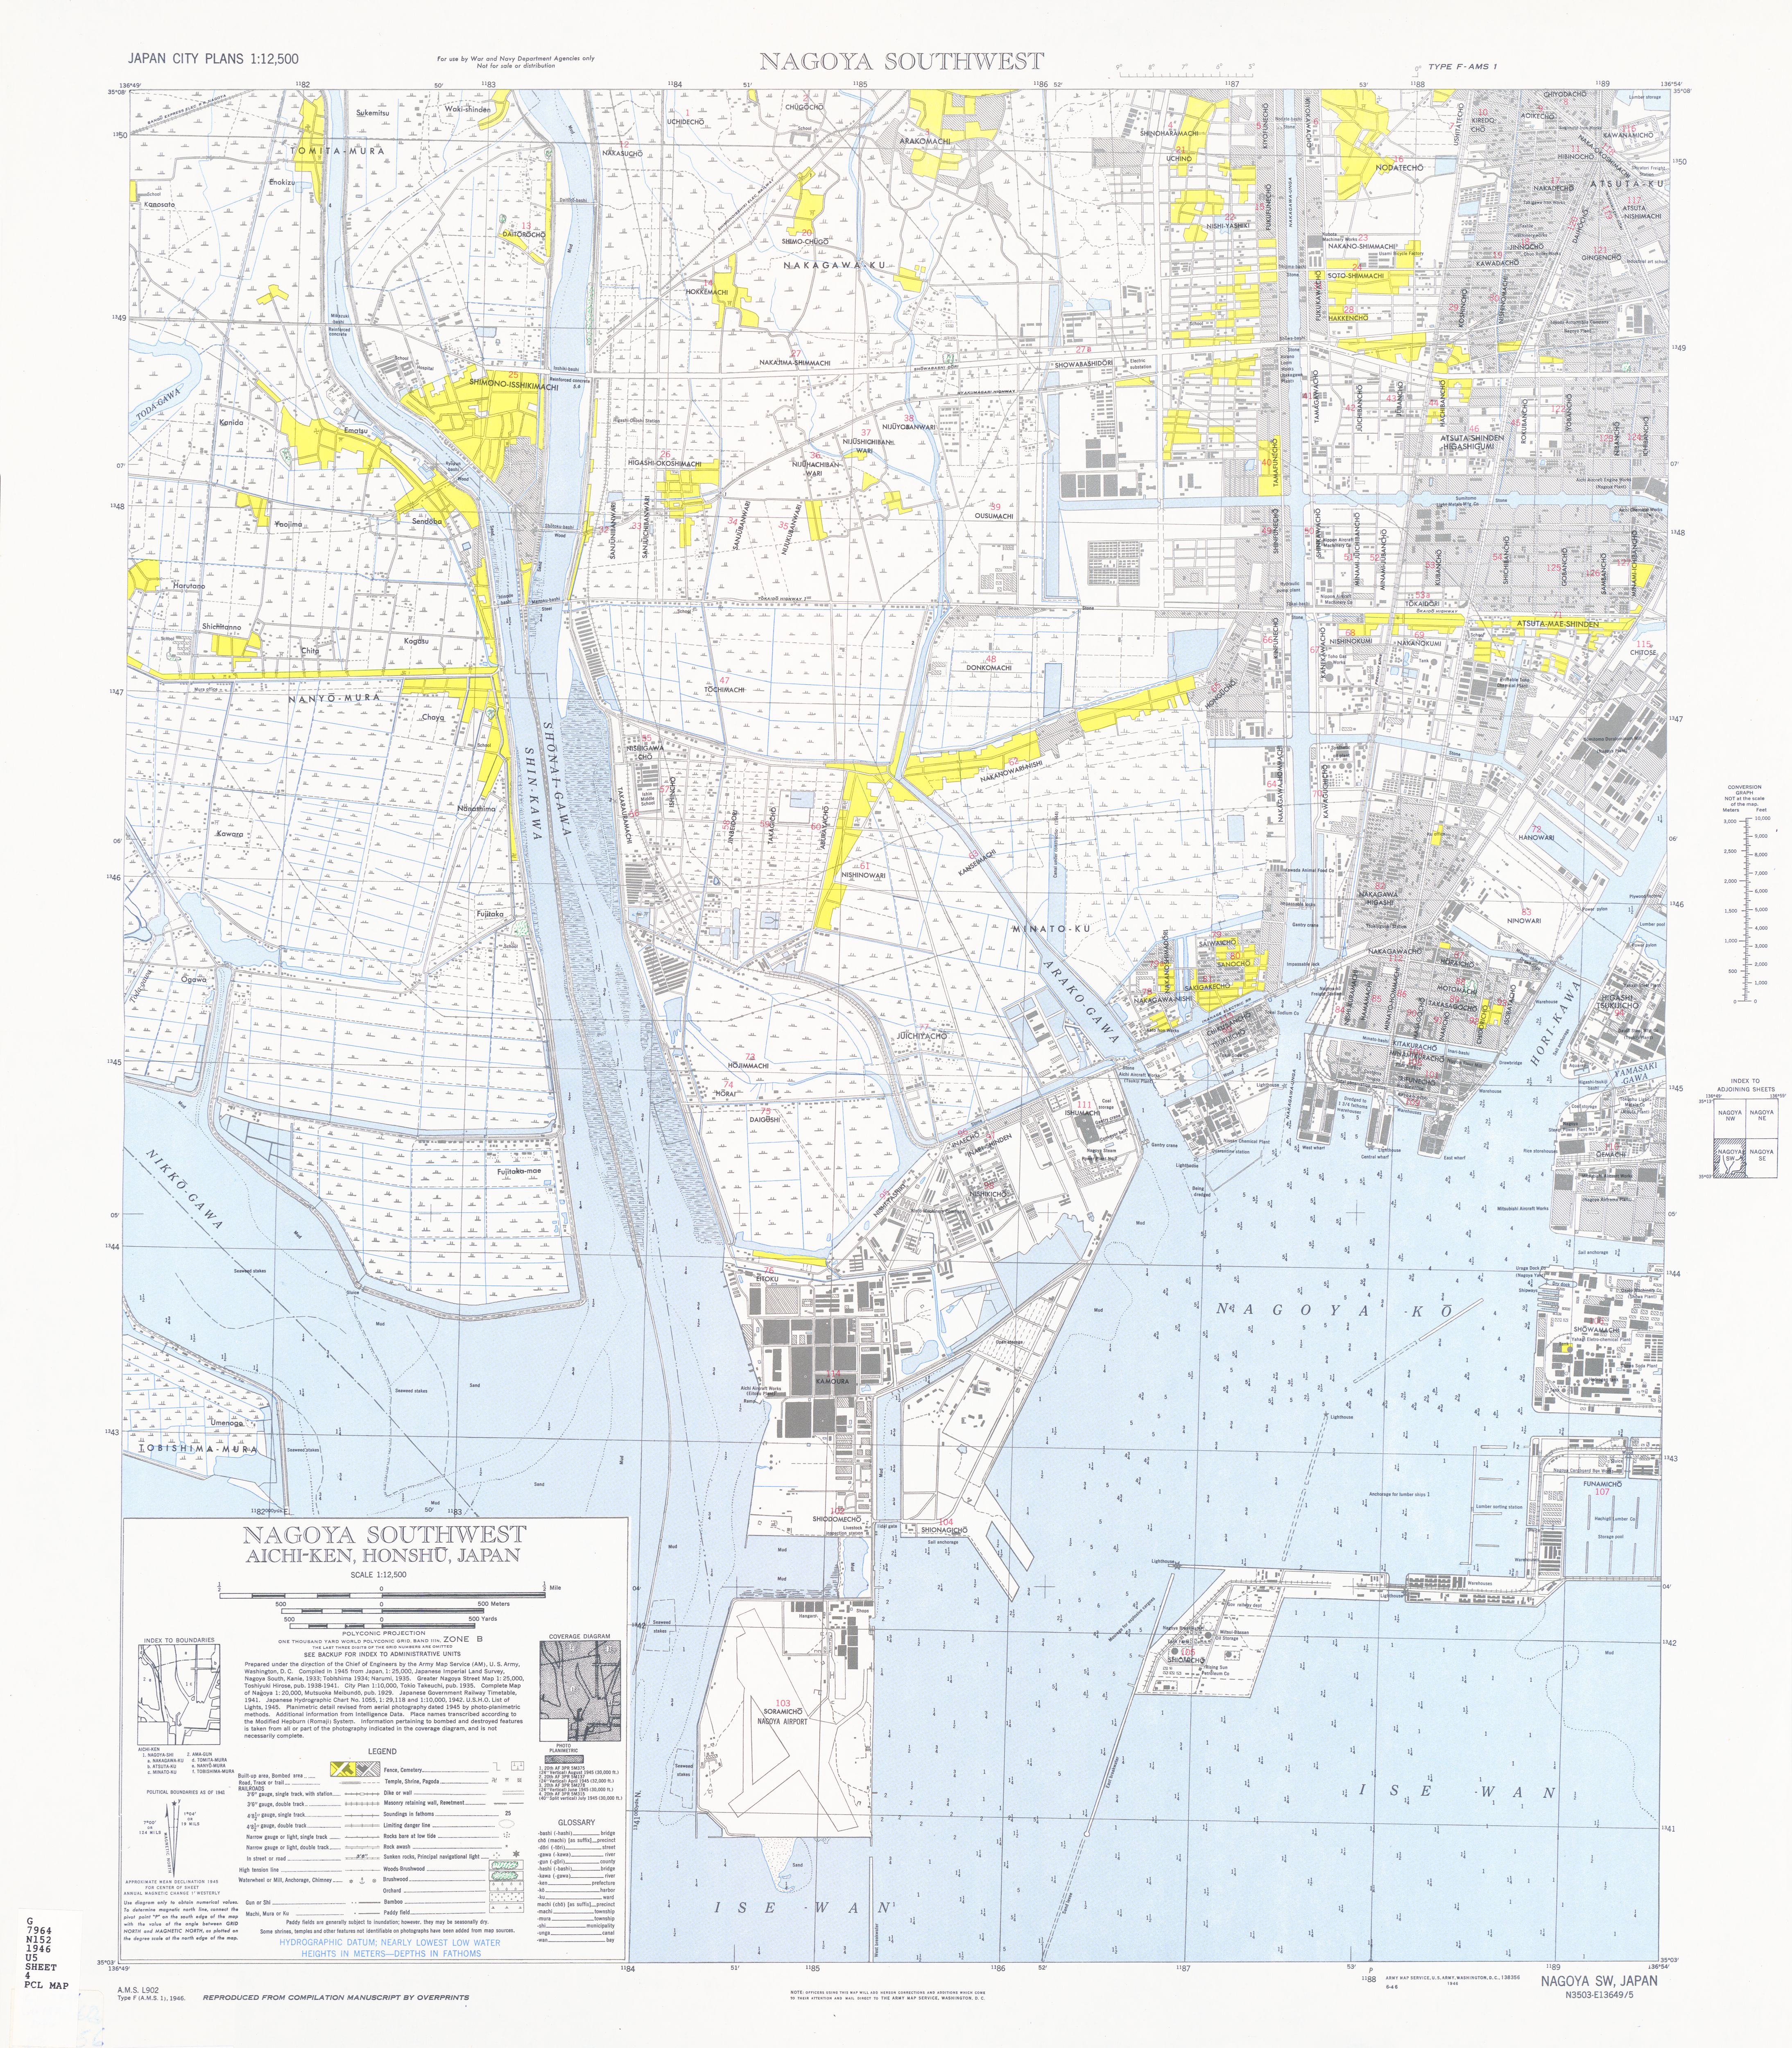
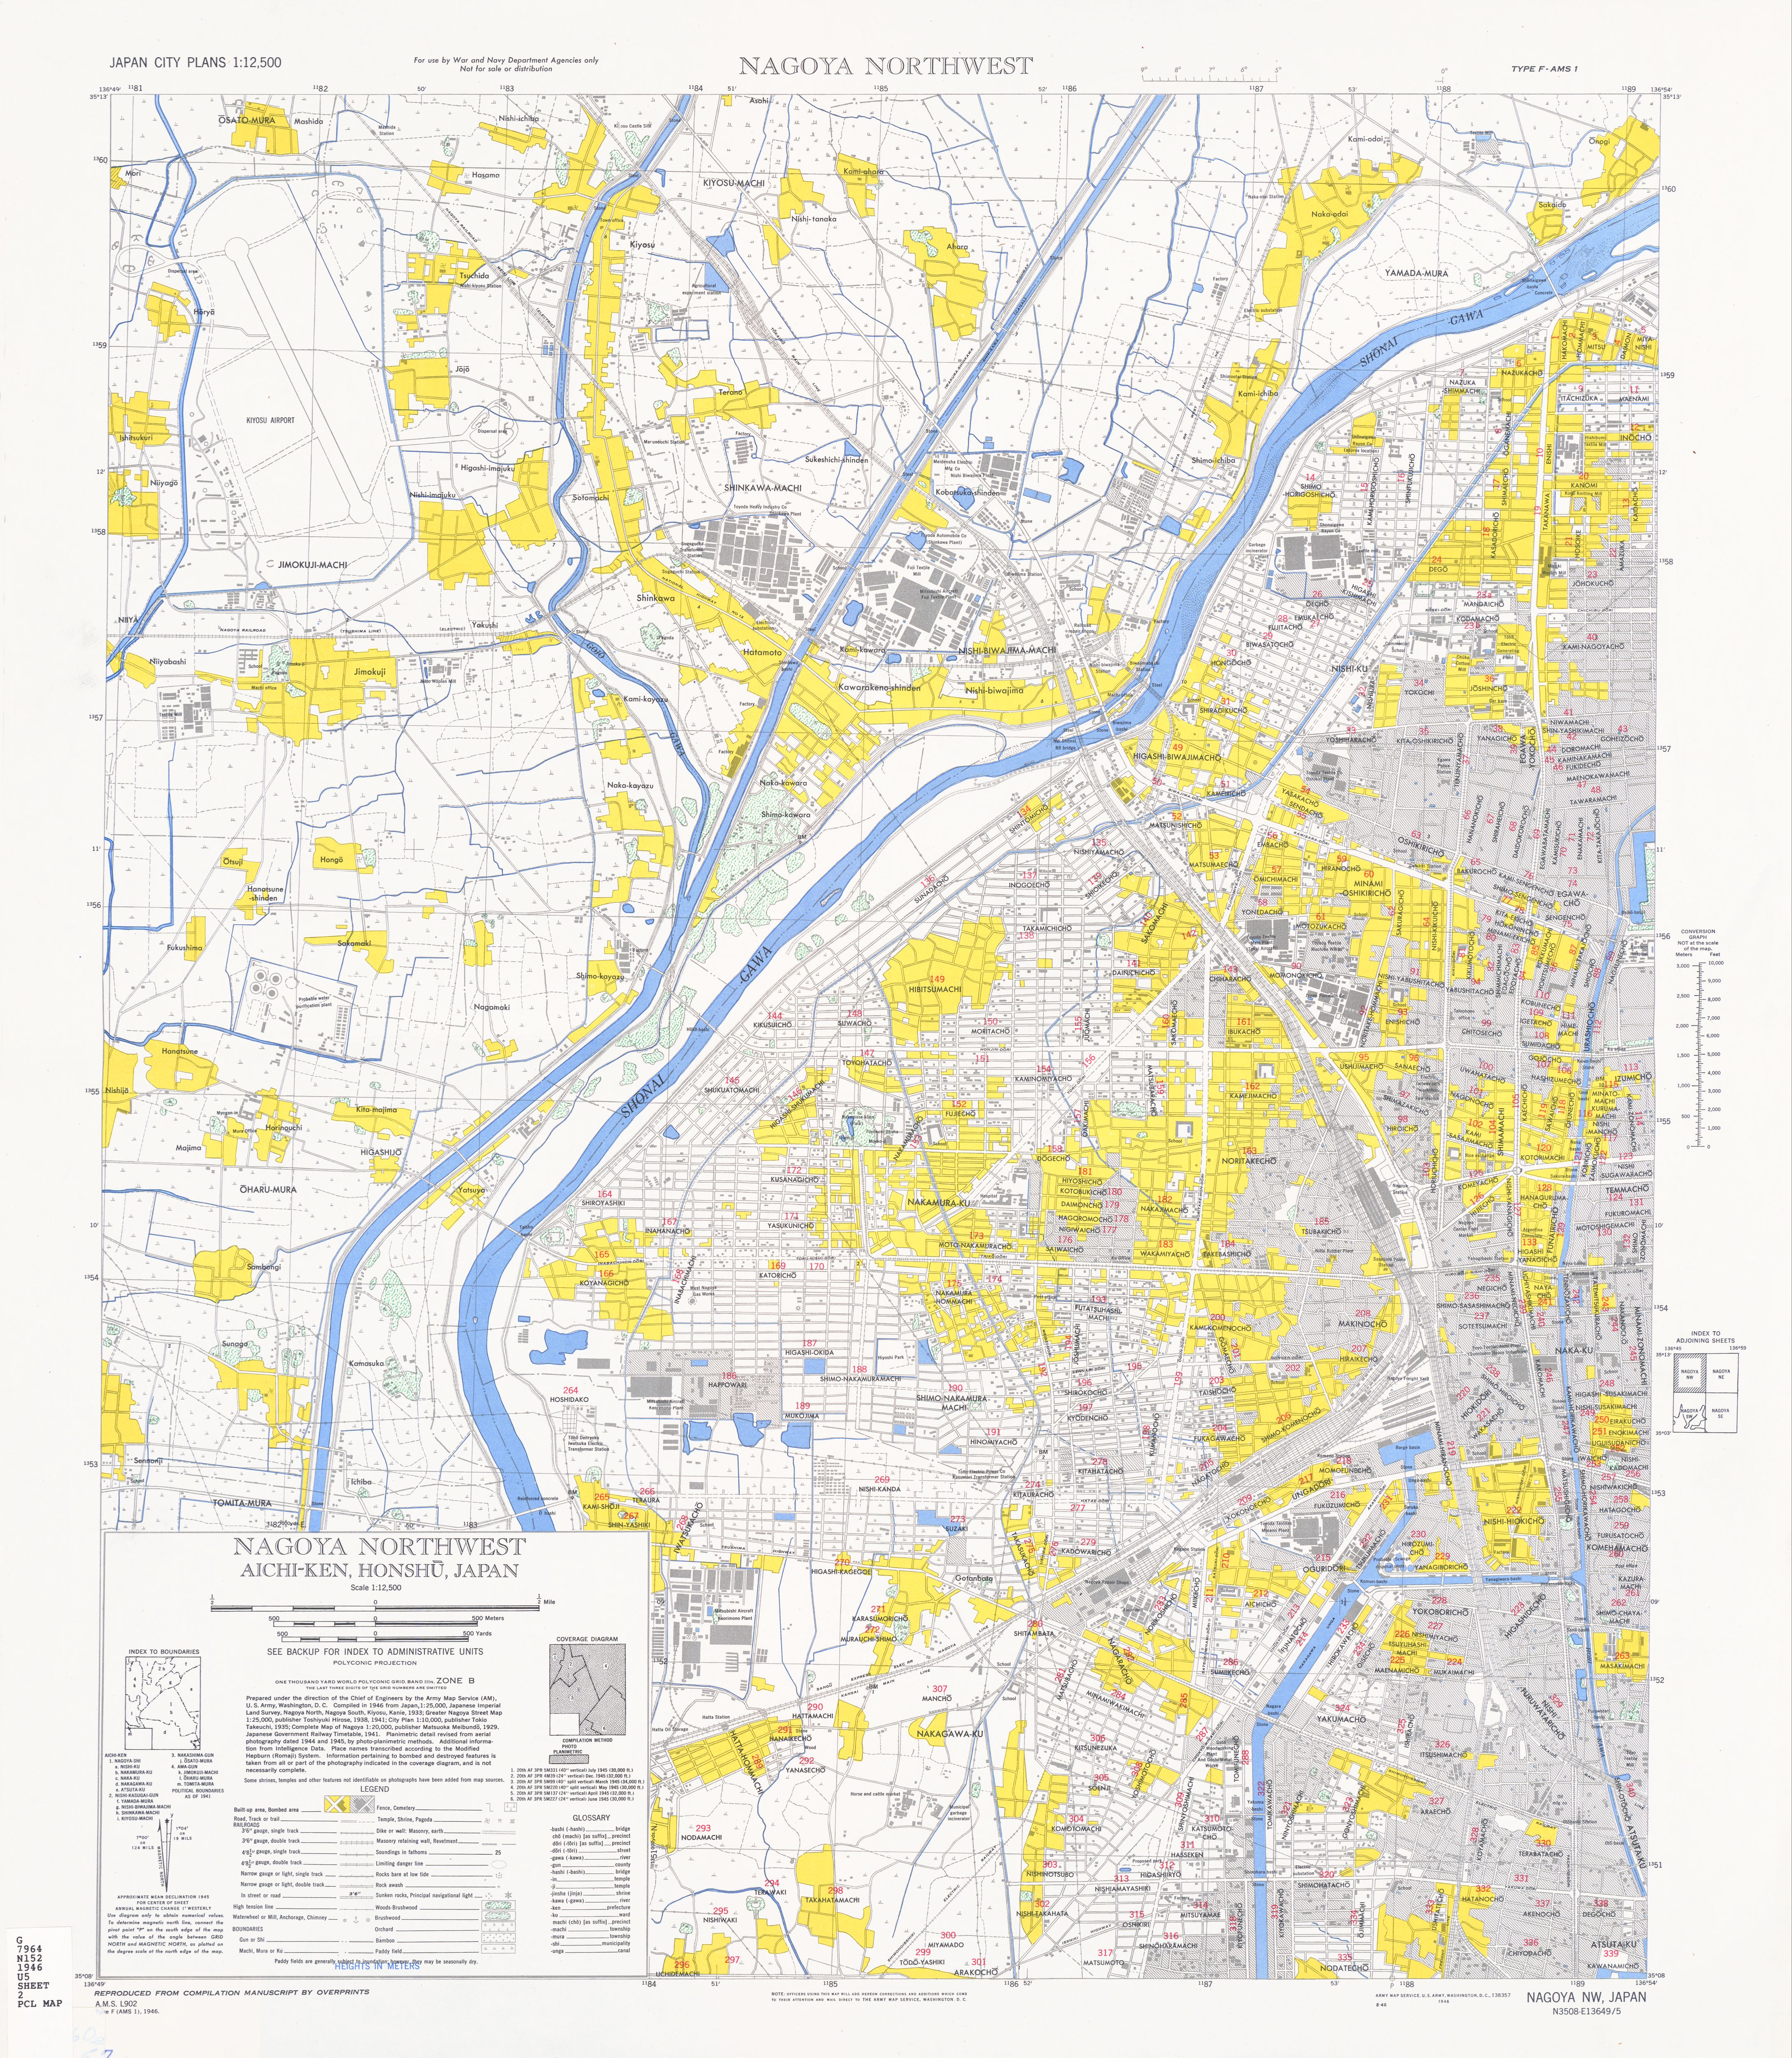
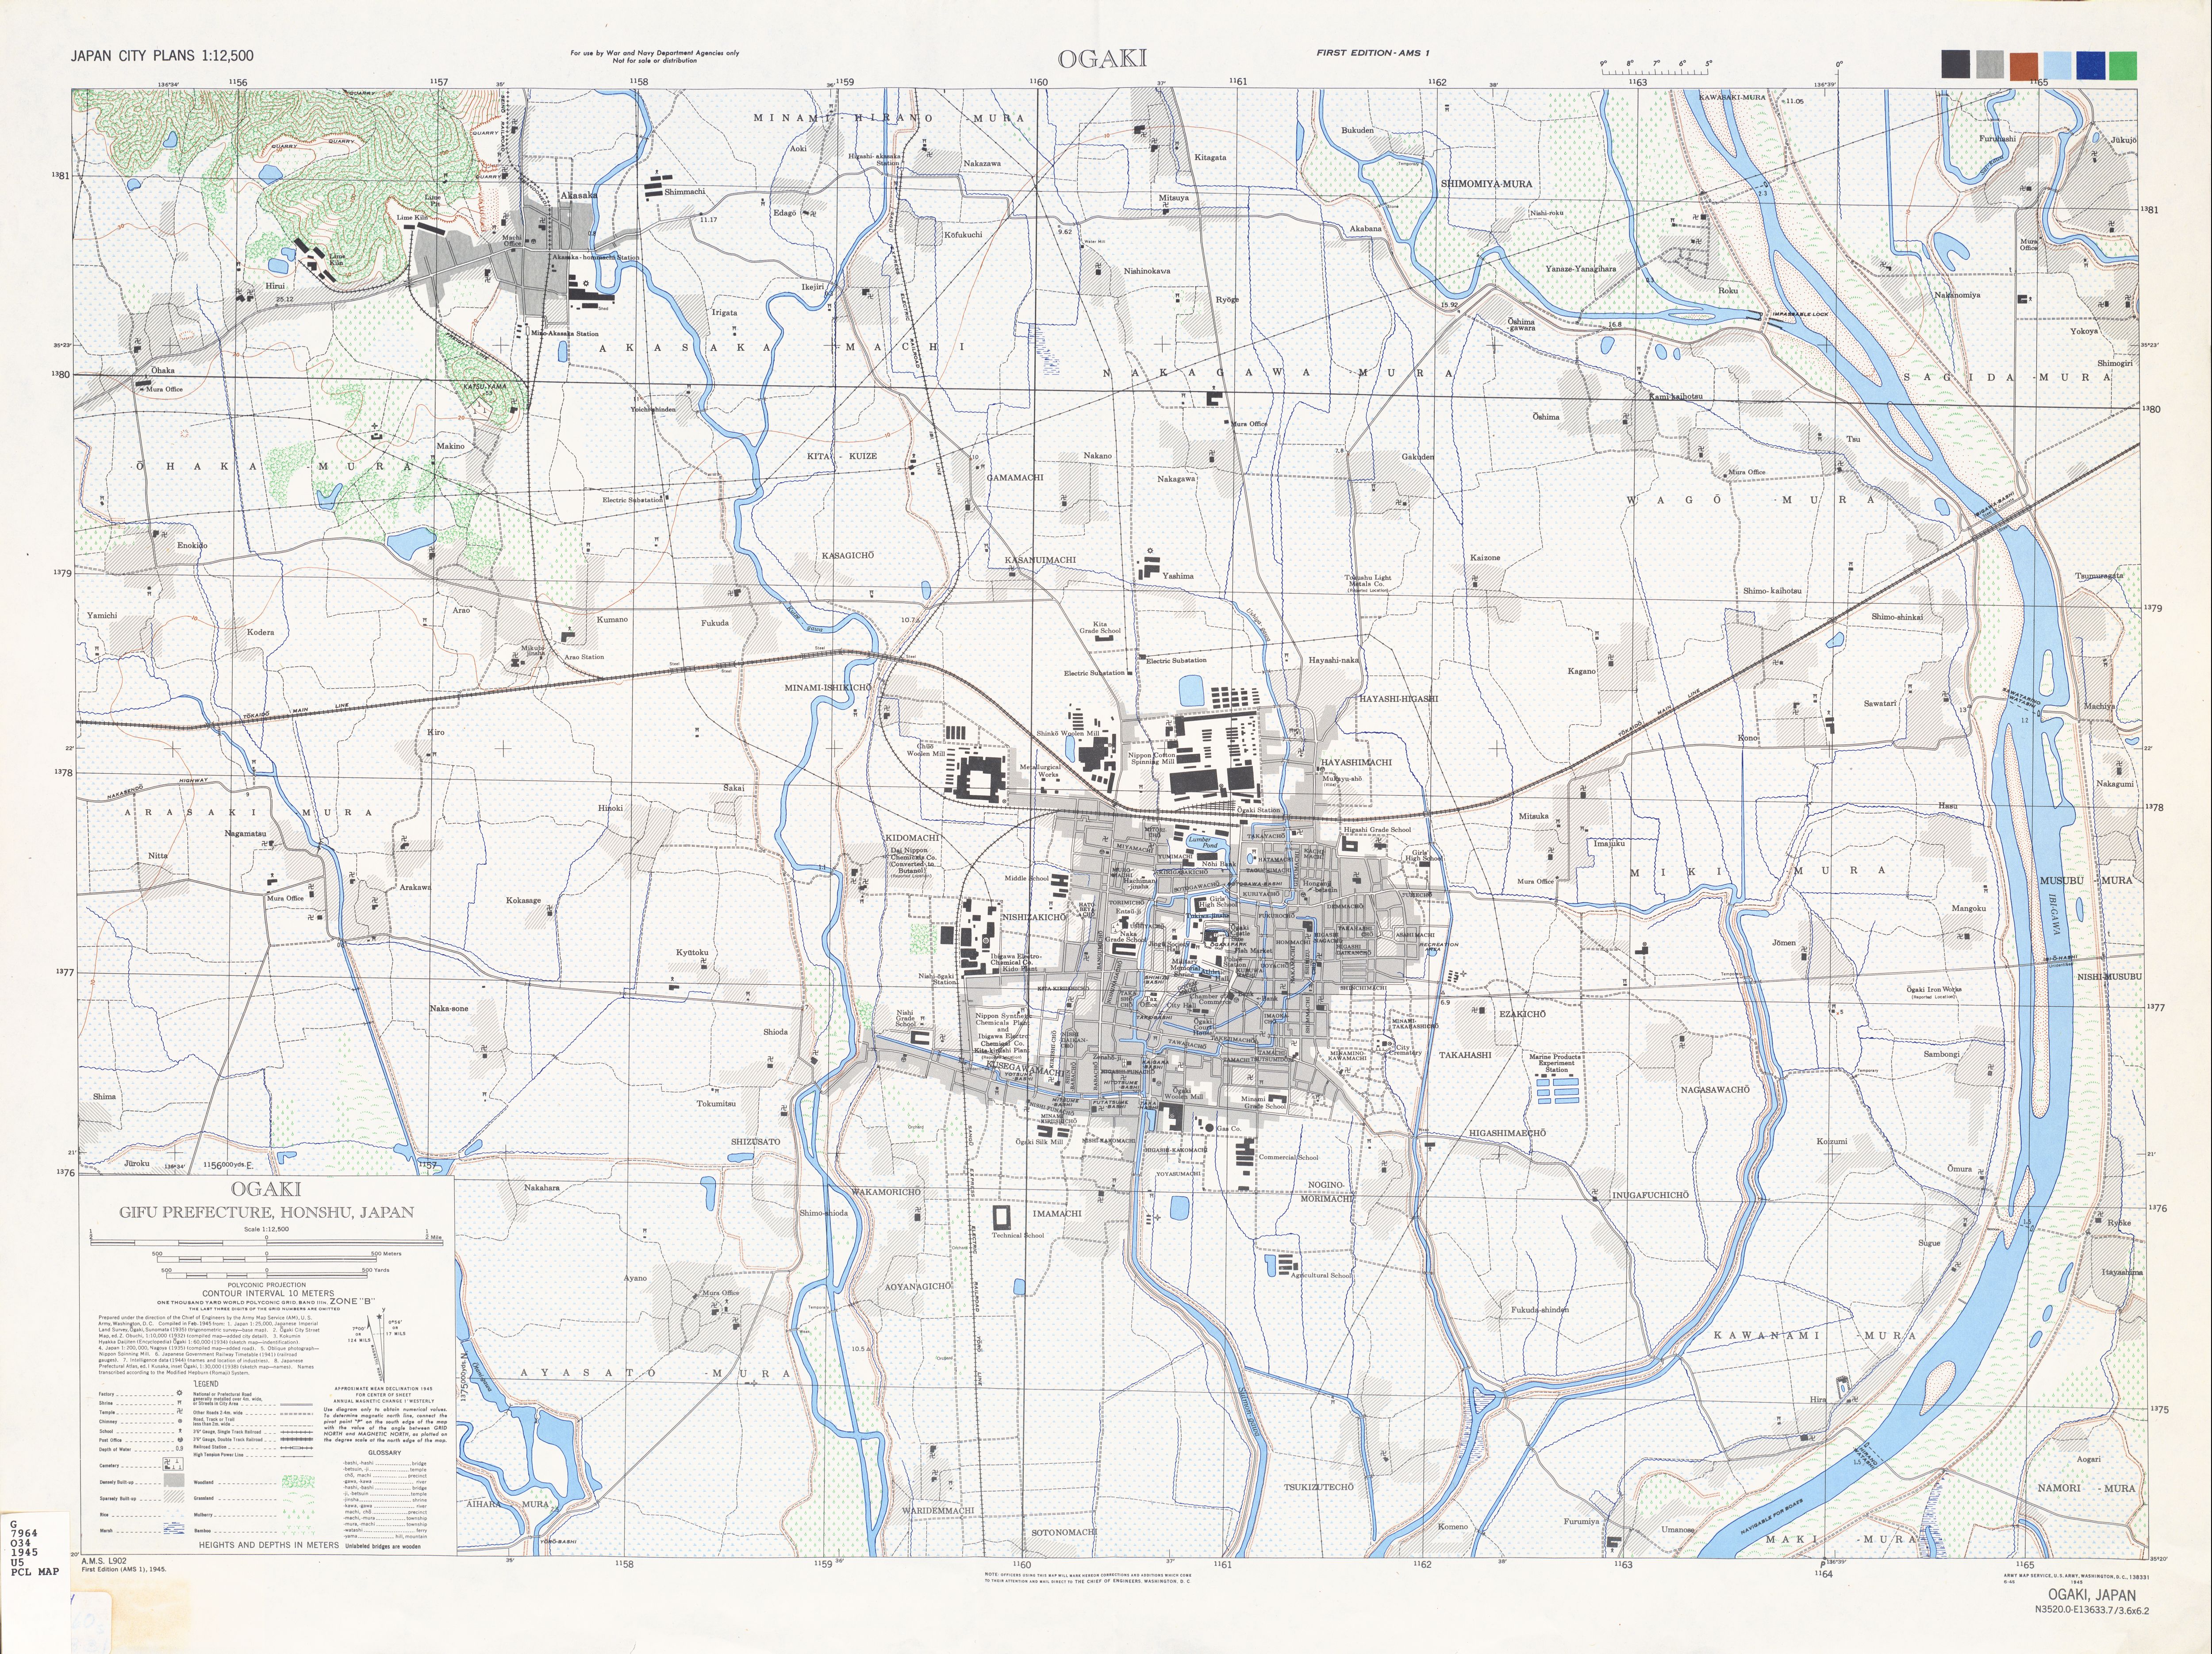
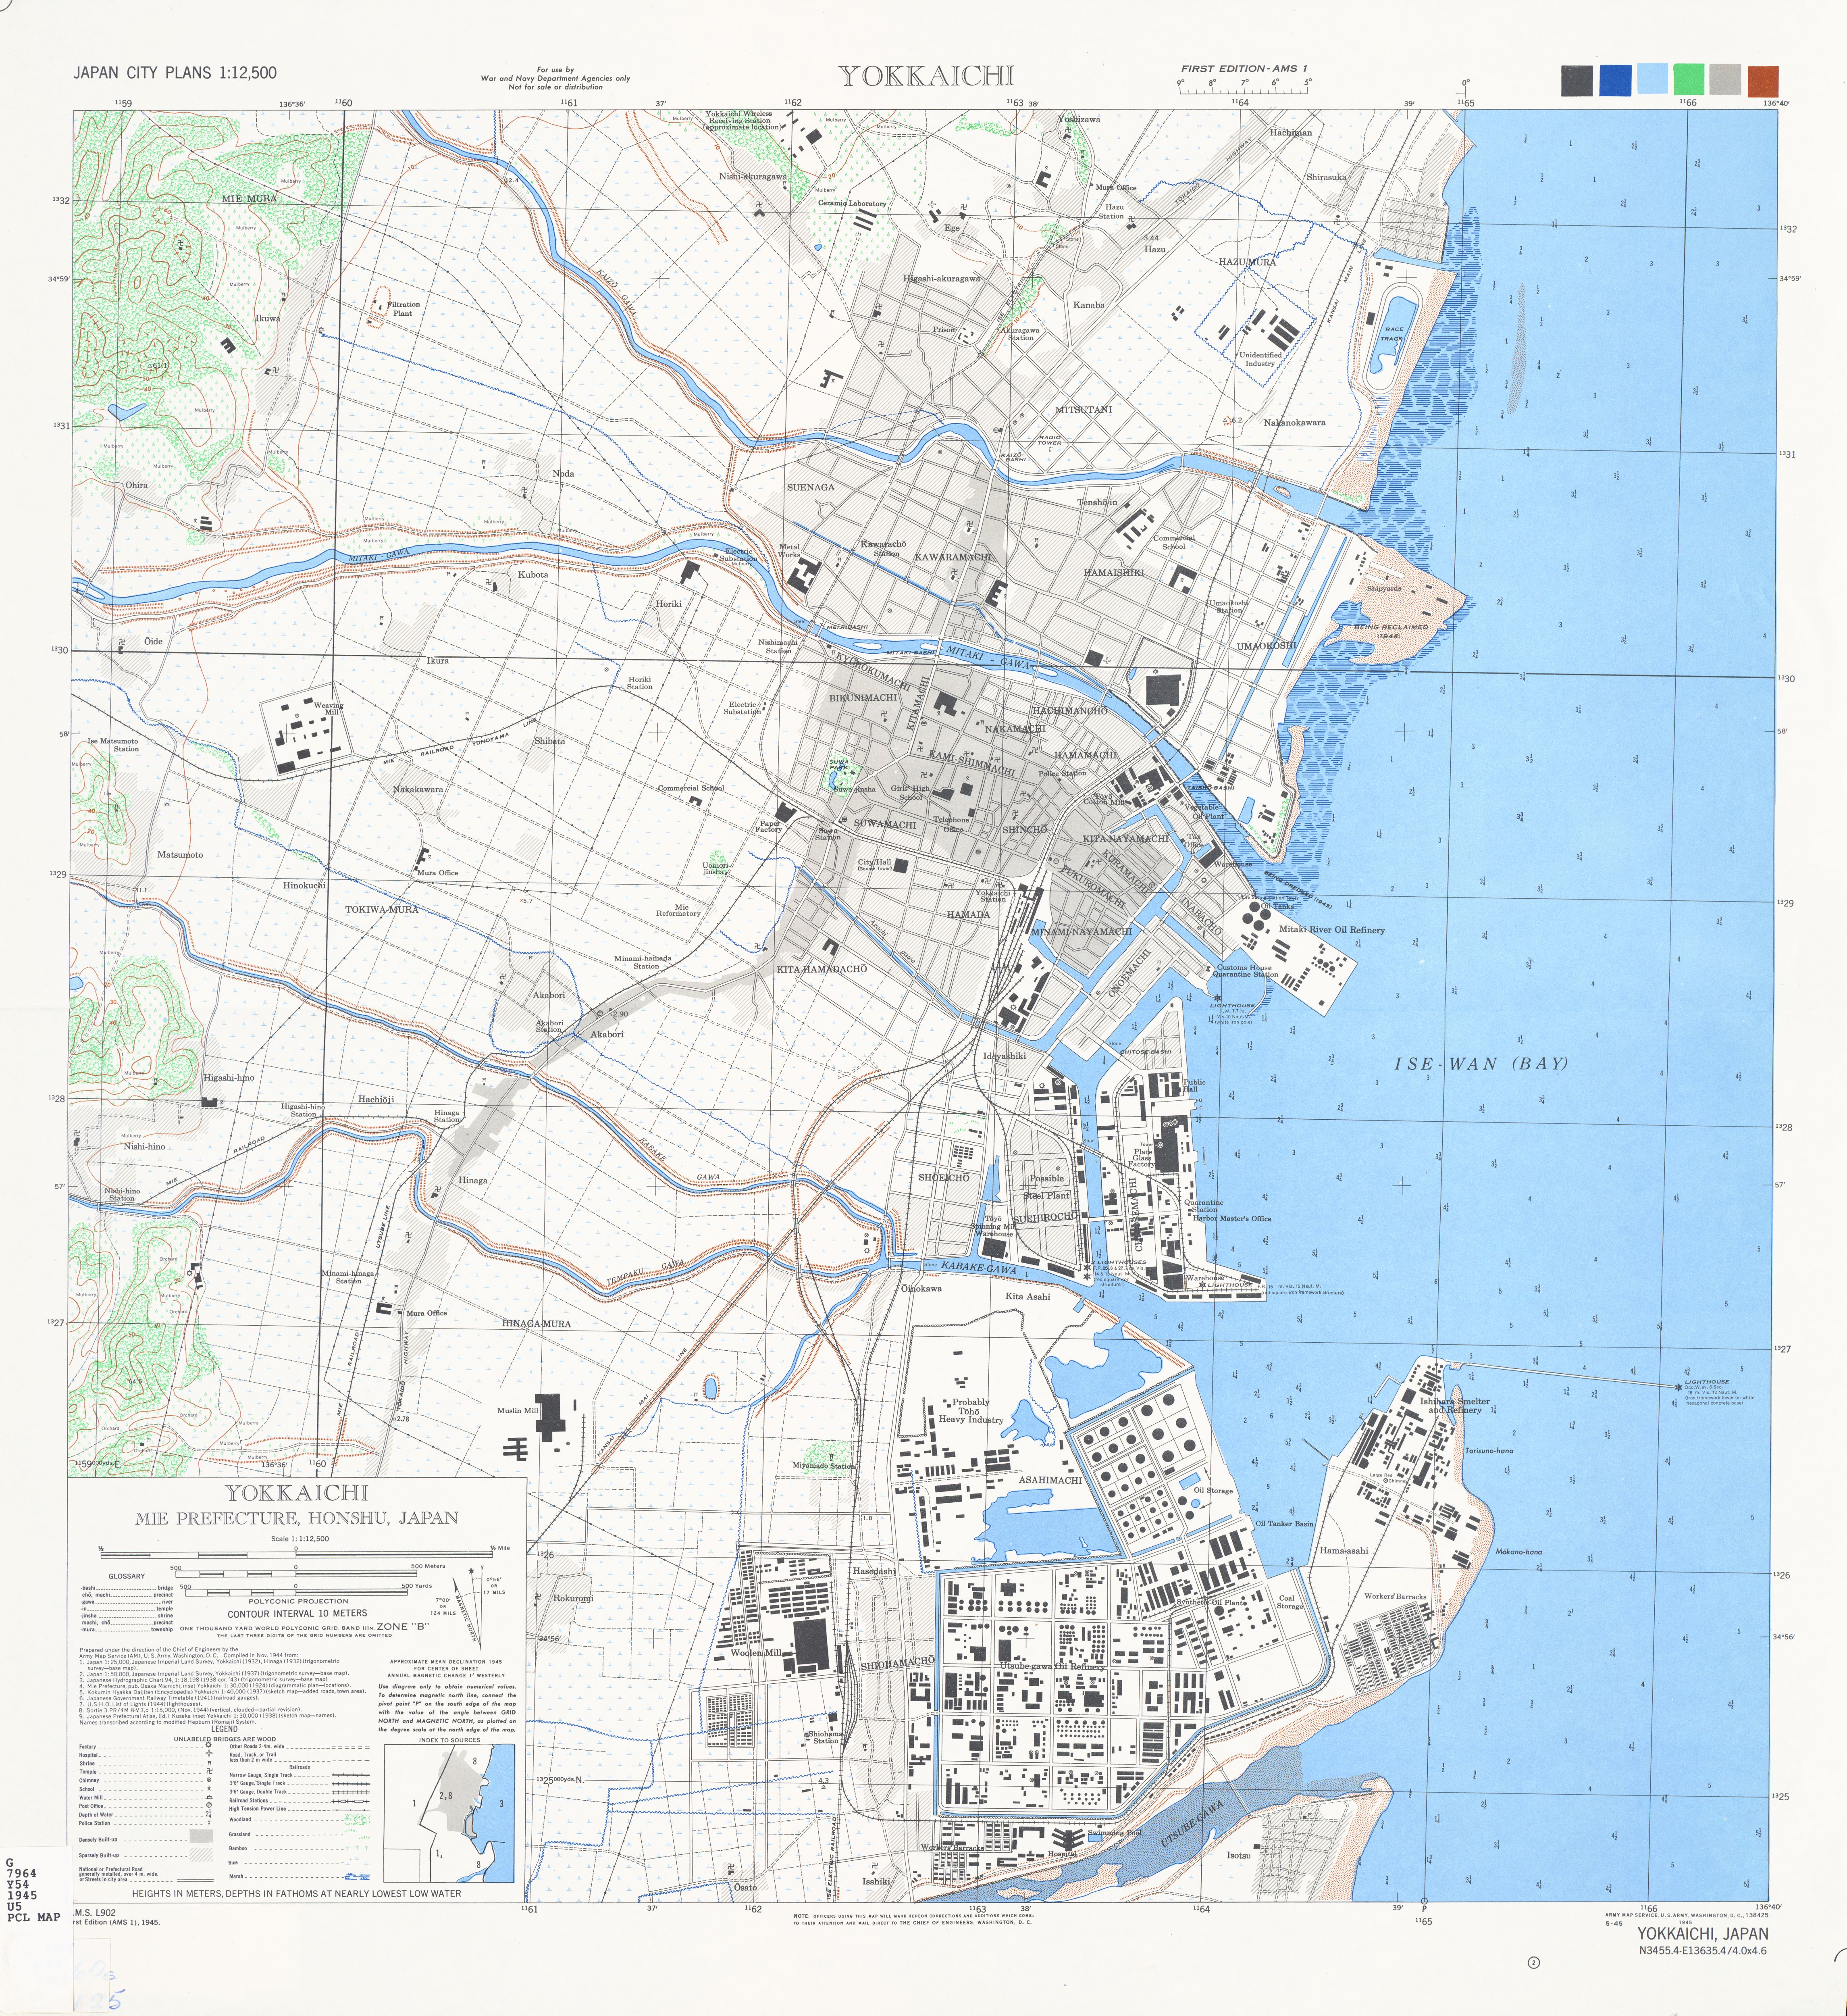
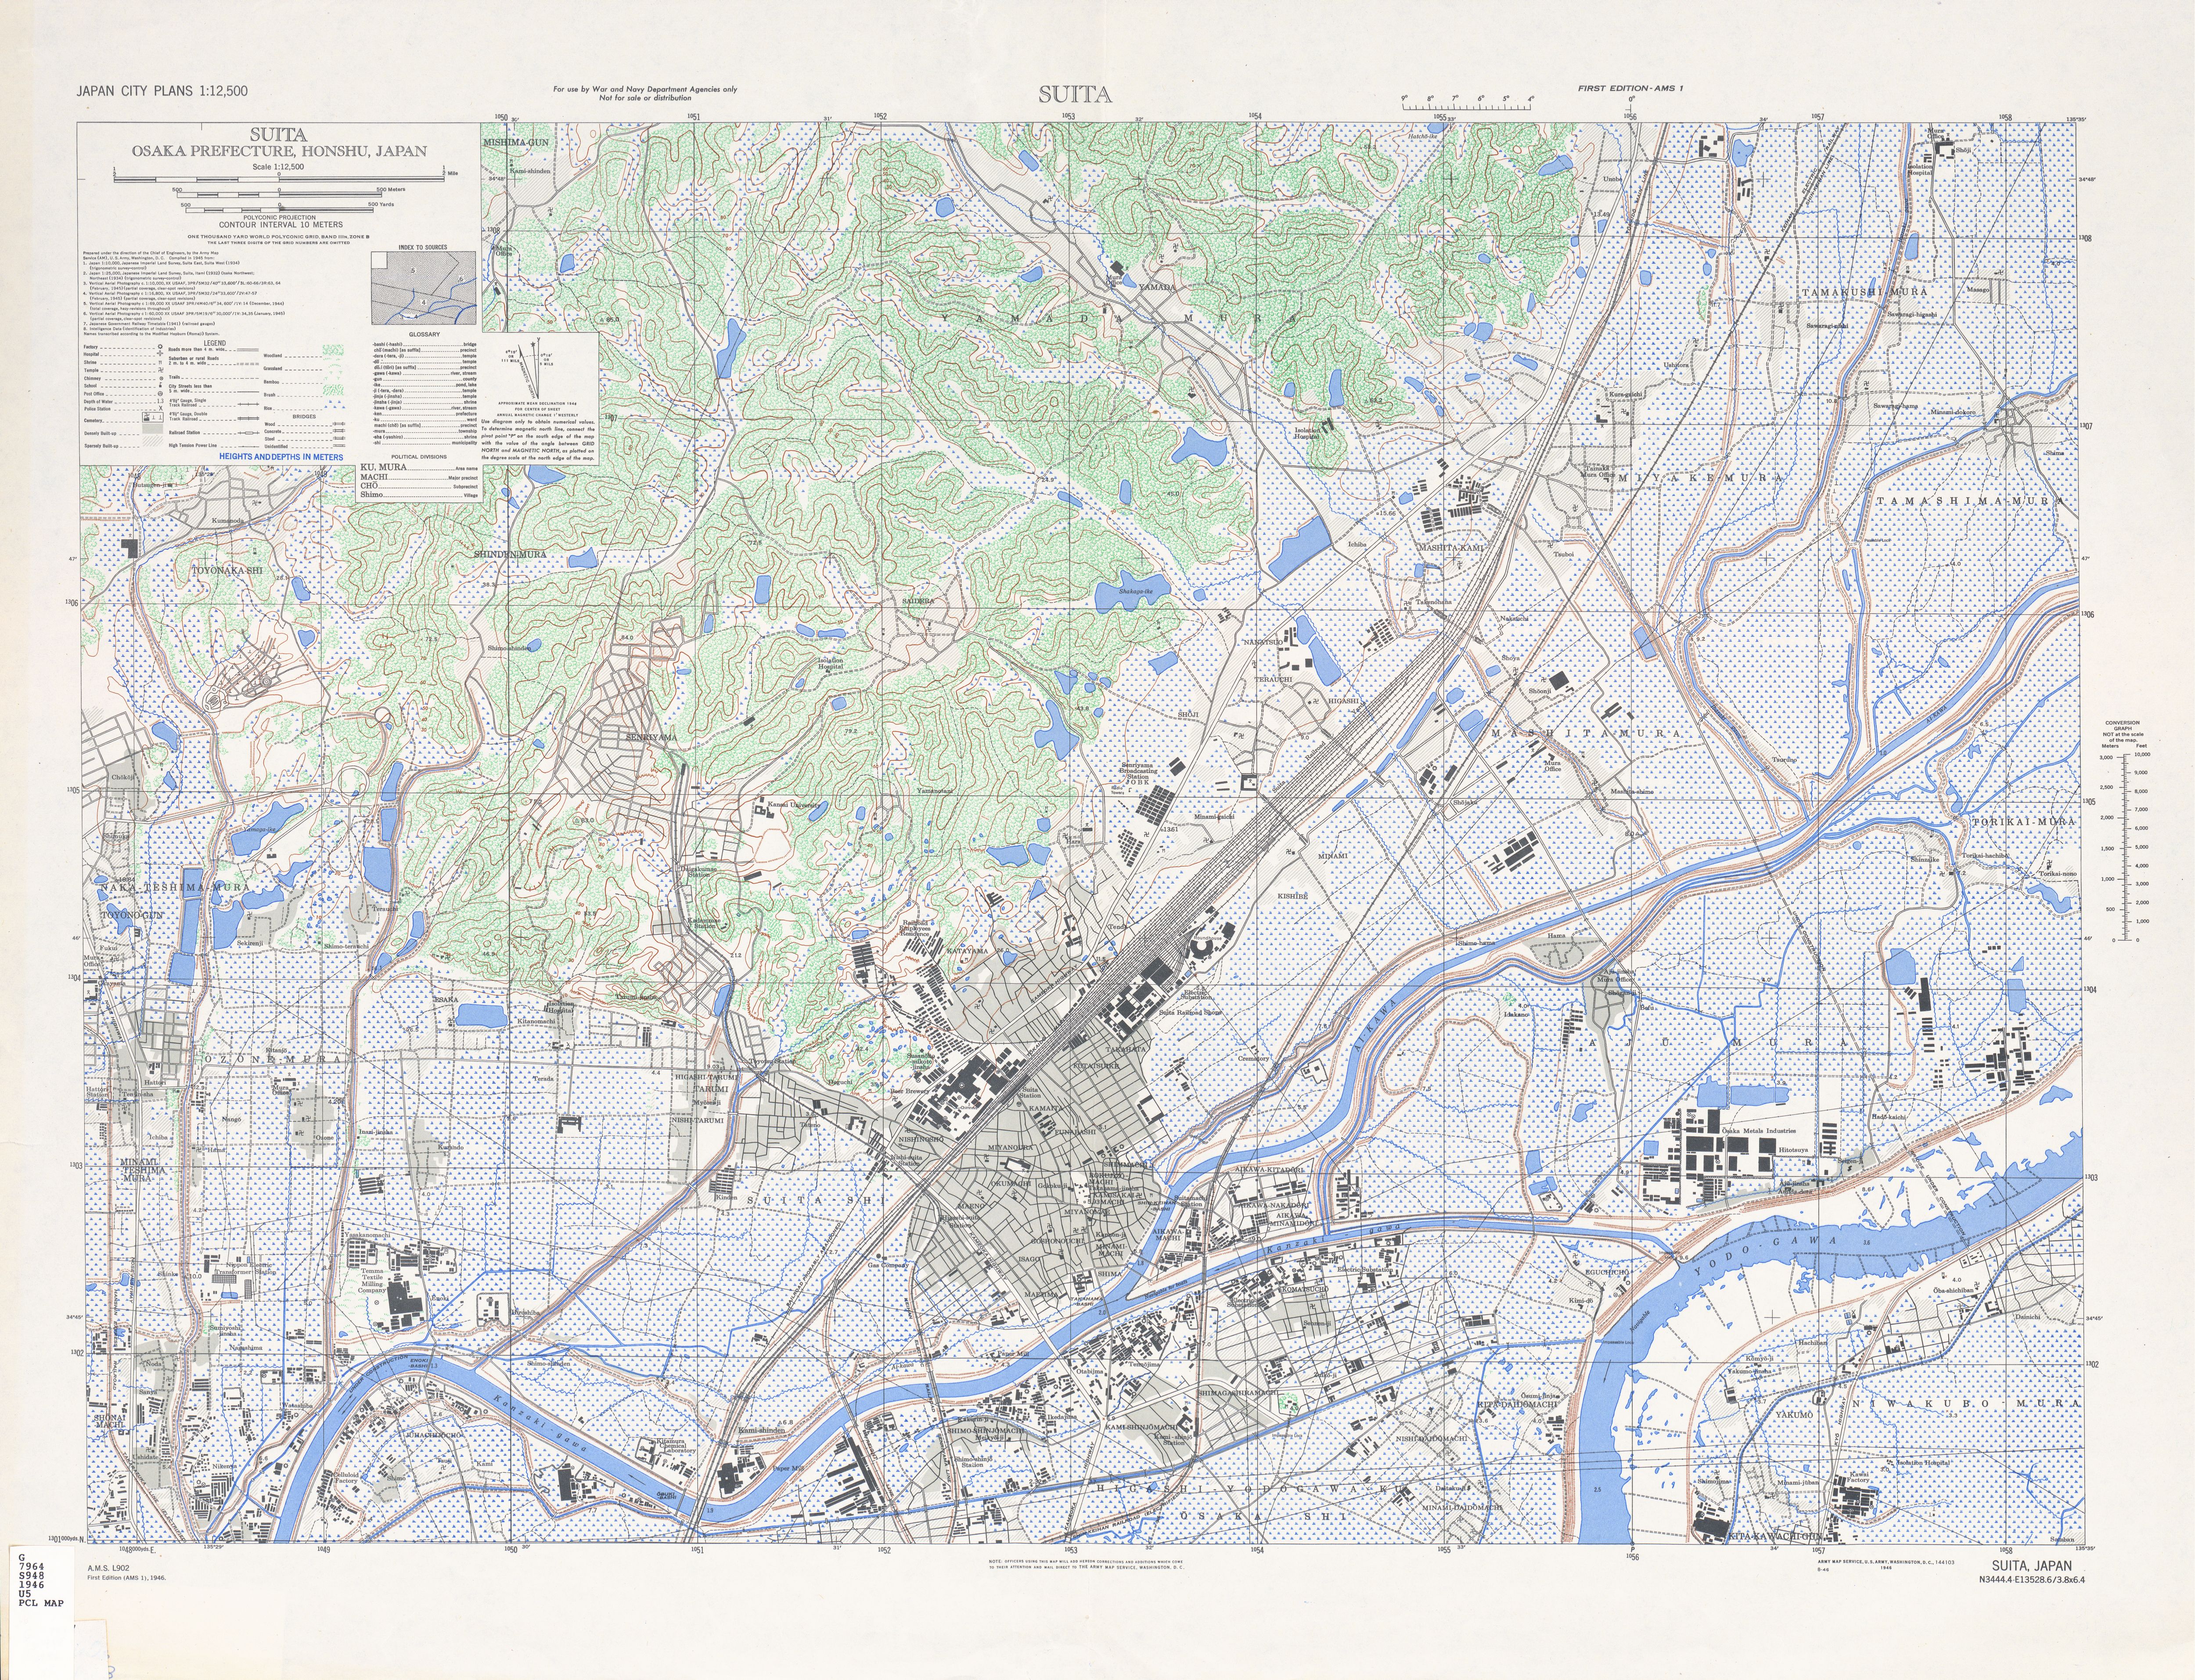
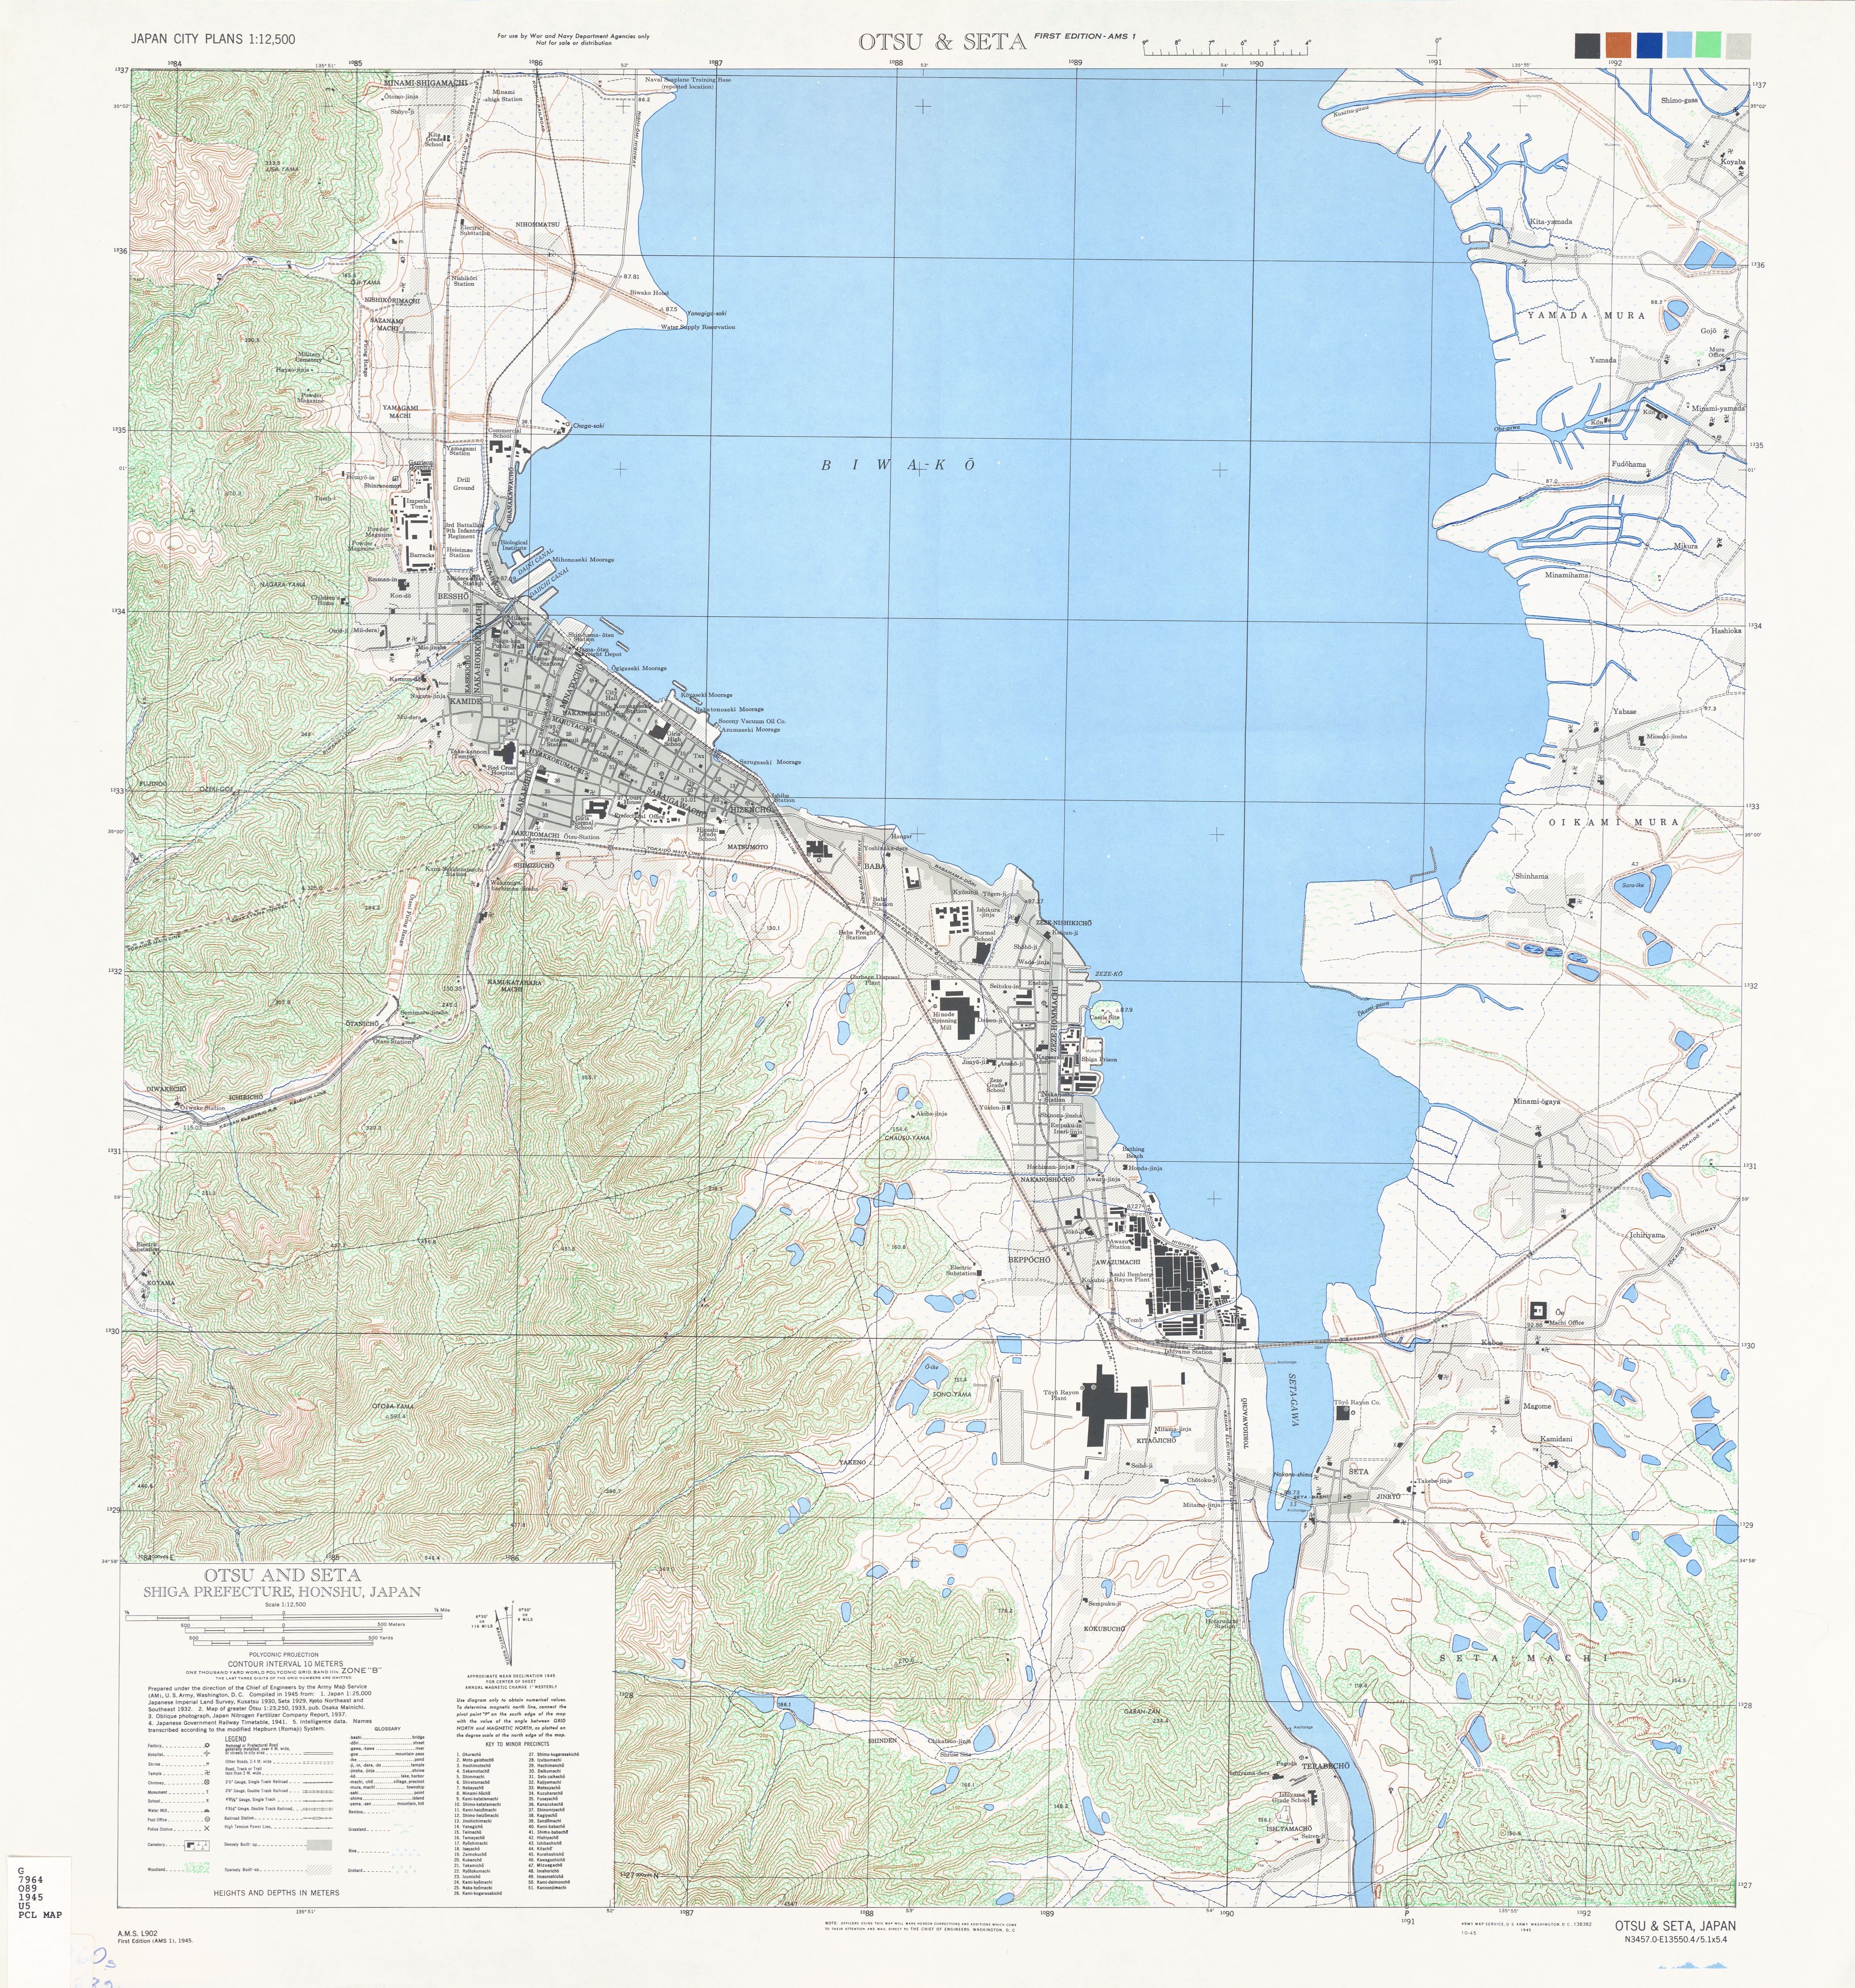
Japan City Plans 1:12,500 (U.S. Army Map Service, 1944)
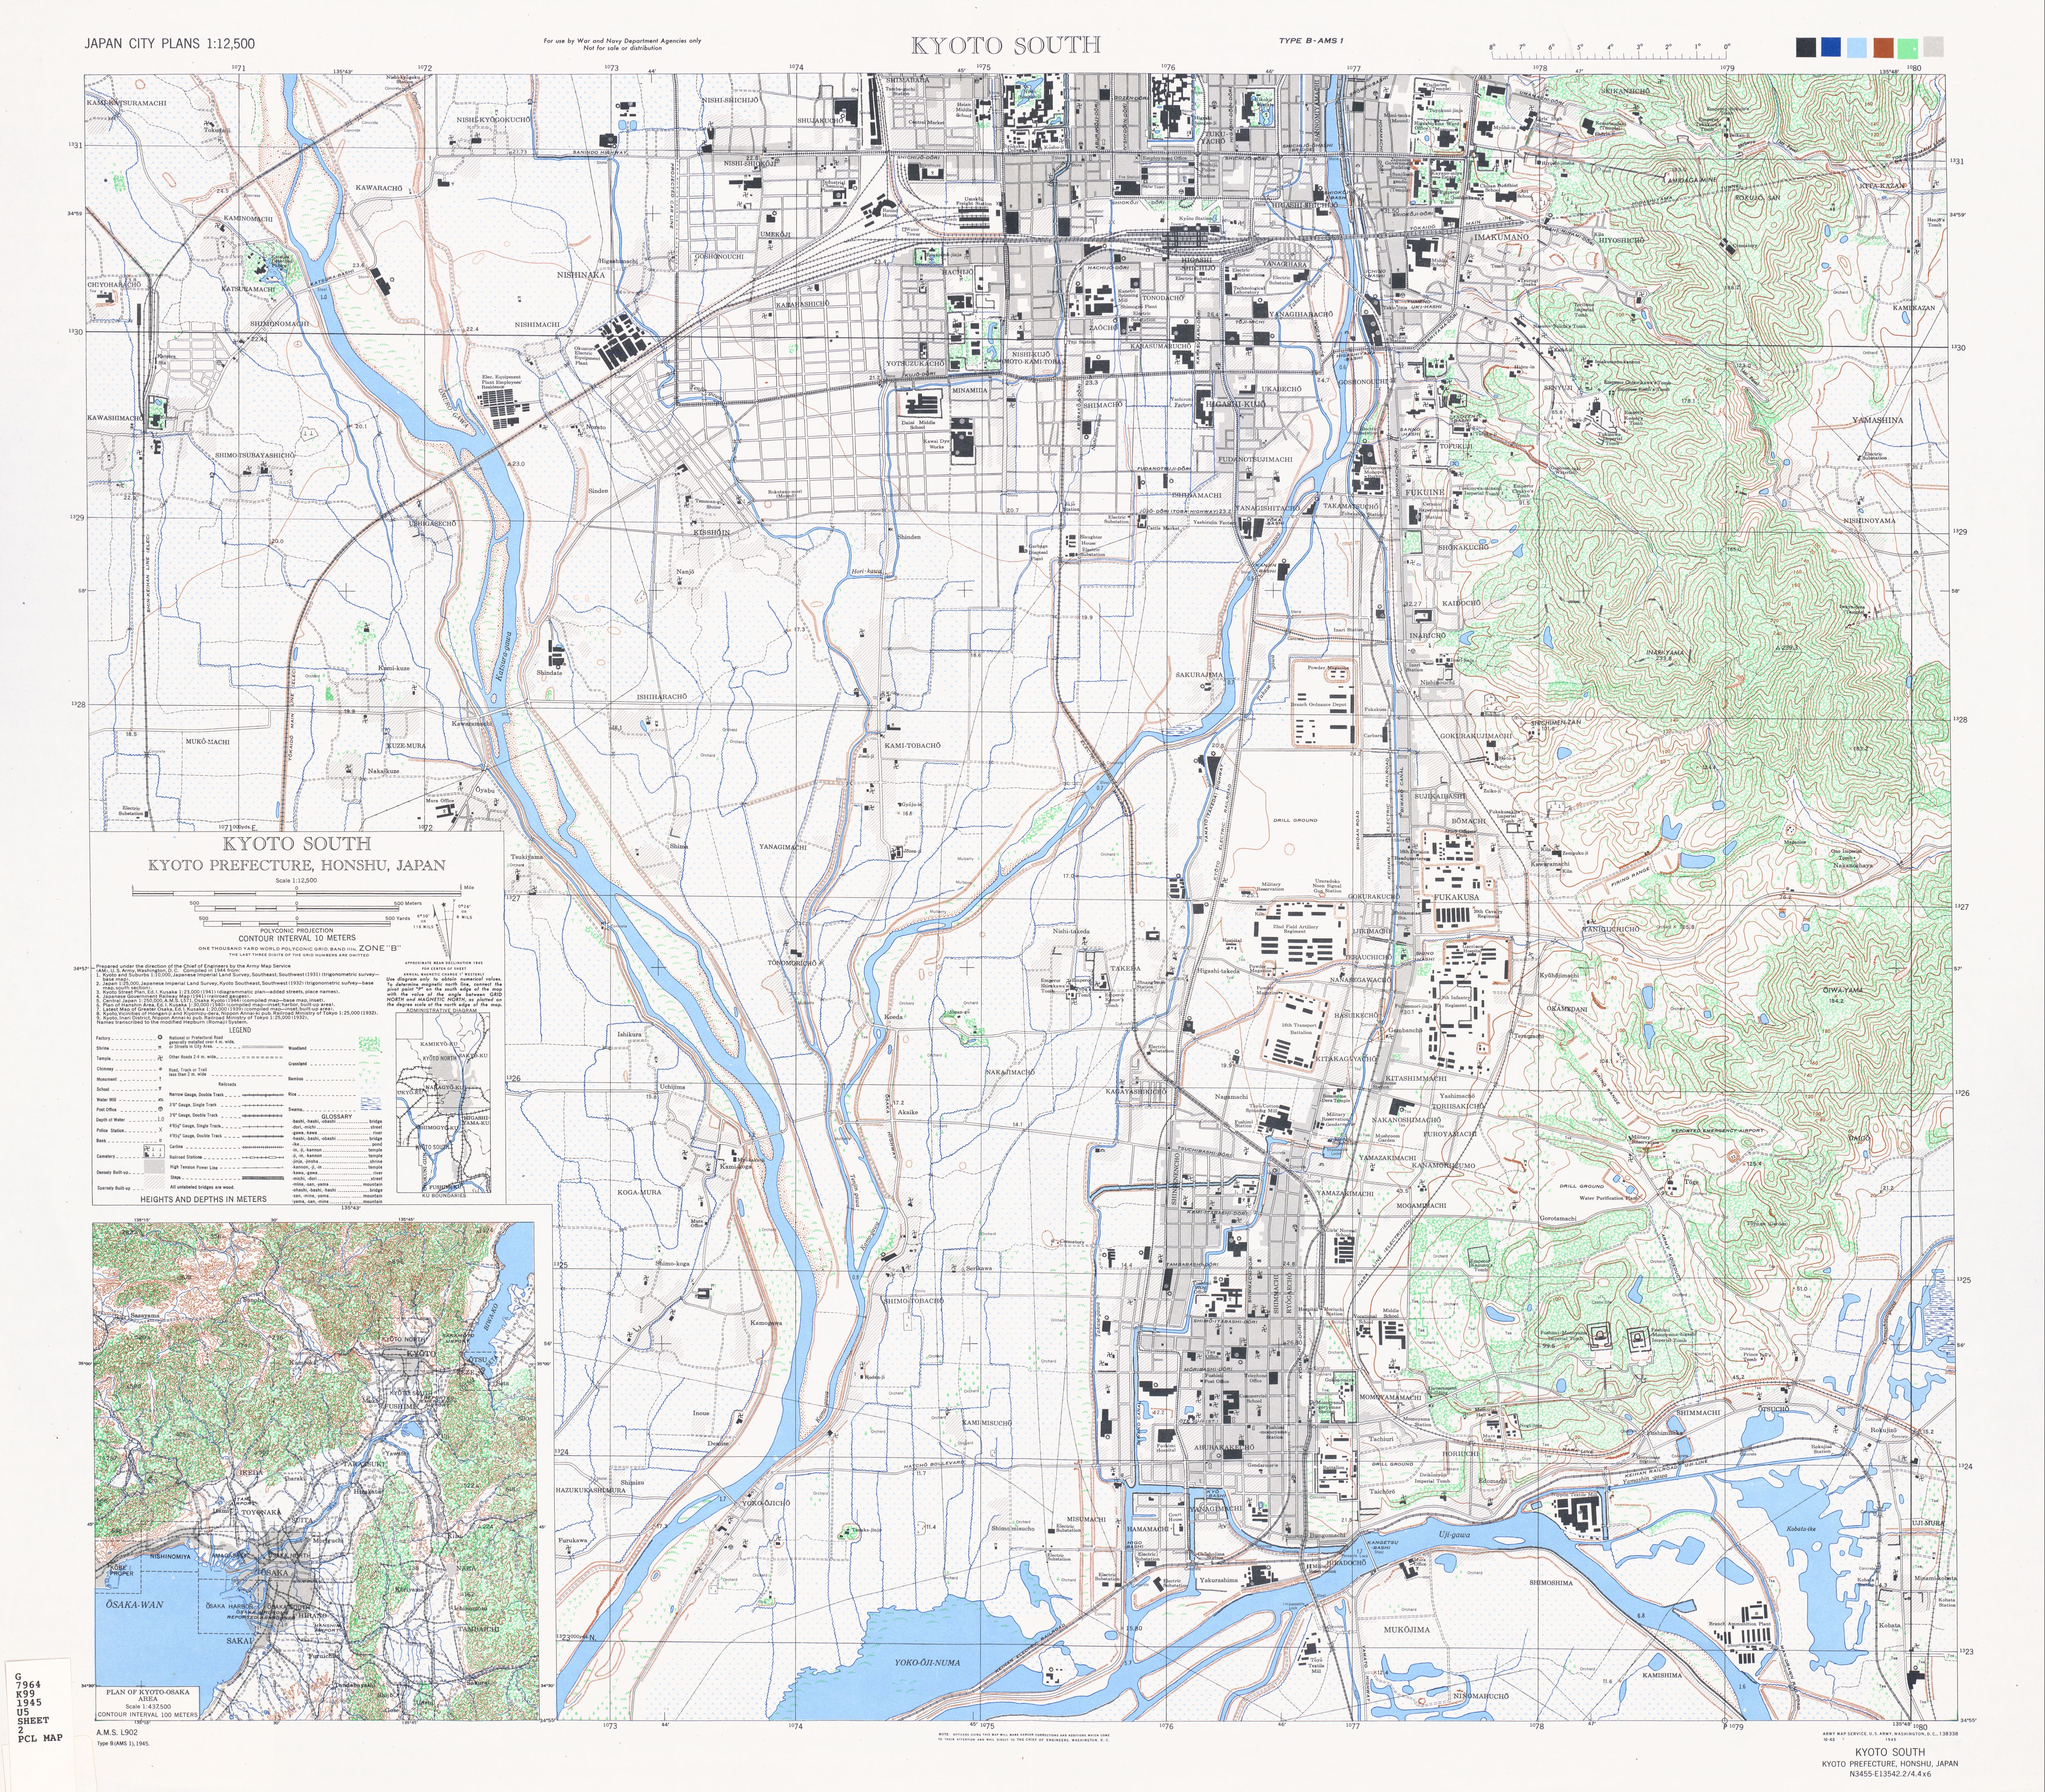
First and foremost, a VERY large thanks to the Library at the University of Texas at Austin. In the archives exists a set of maps of Japanese Cities that was used for military activities against Japan during WWII. These maps are of high quality and provide a snapshot of the layout of towns in Japan during 1945-46. Specifically of interest to me was the city map of Kyoto South.
I was busy inspecting the Umekoji roundhouse to the west of the main station when I saw (what looked like) a moat ... built of railway track. A square border exists on the map, and since Kyoto was the ex-capital, I initially thought it was a fortification. It then became apparent, after looking down the very west 'wall' that it was, indeed, a tram track. There was a specific gap that had the small note: "PROJECTED CAR LINE".
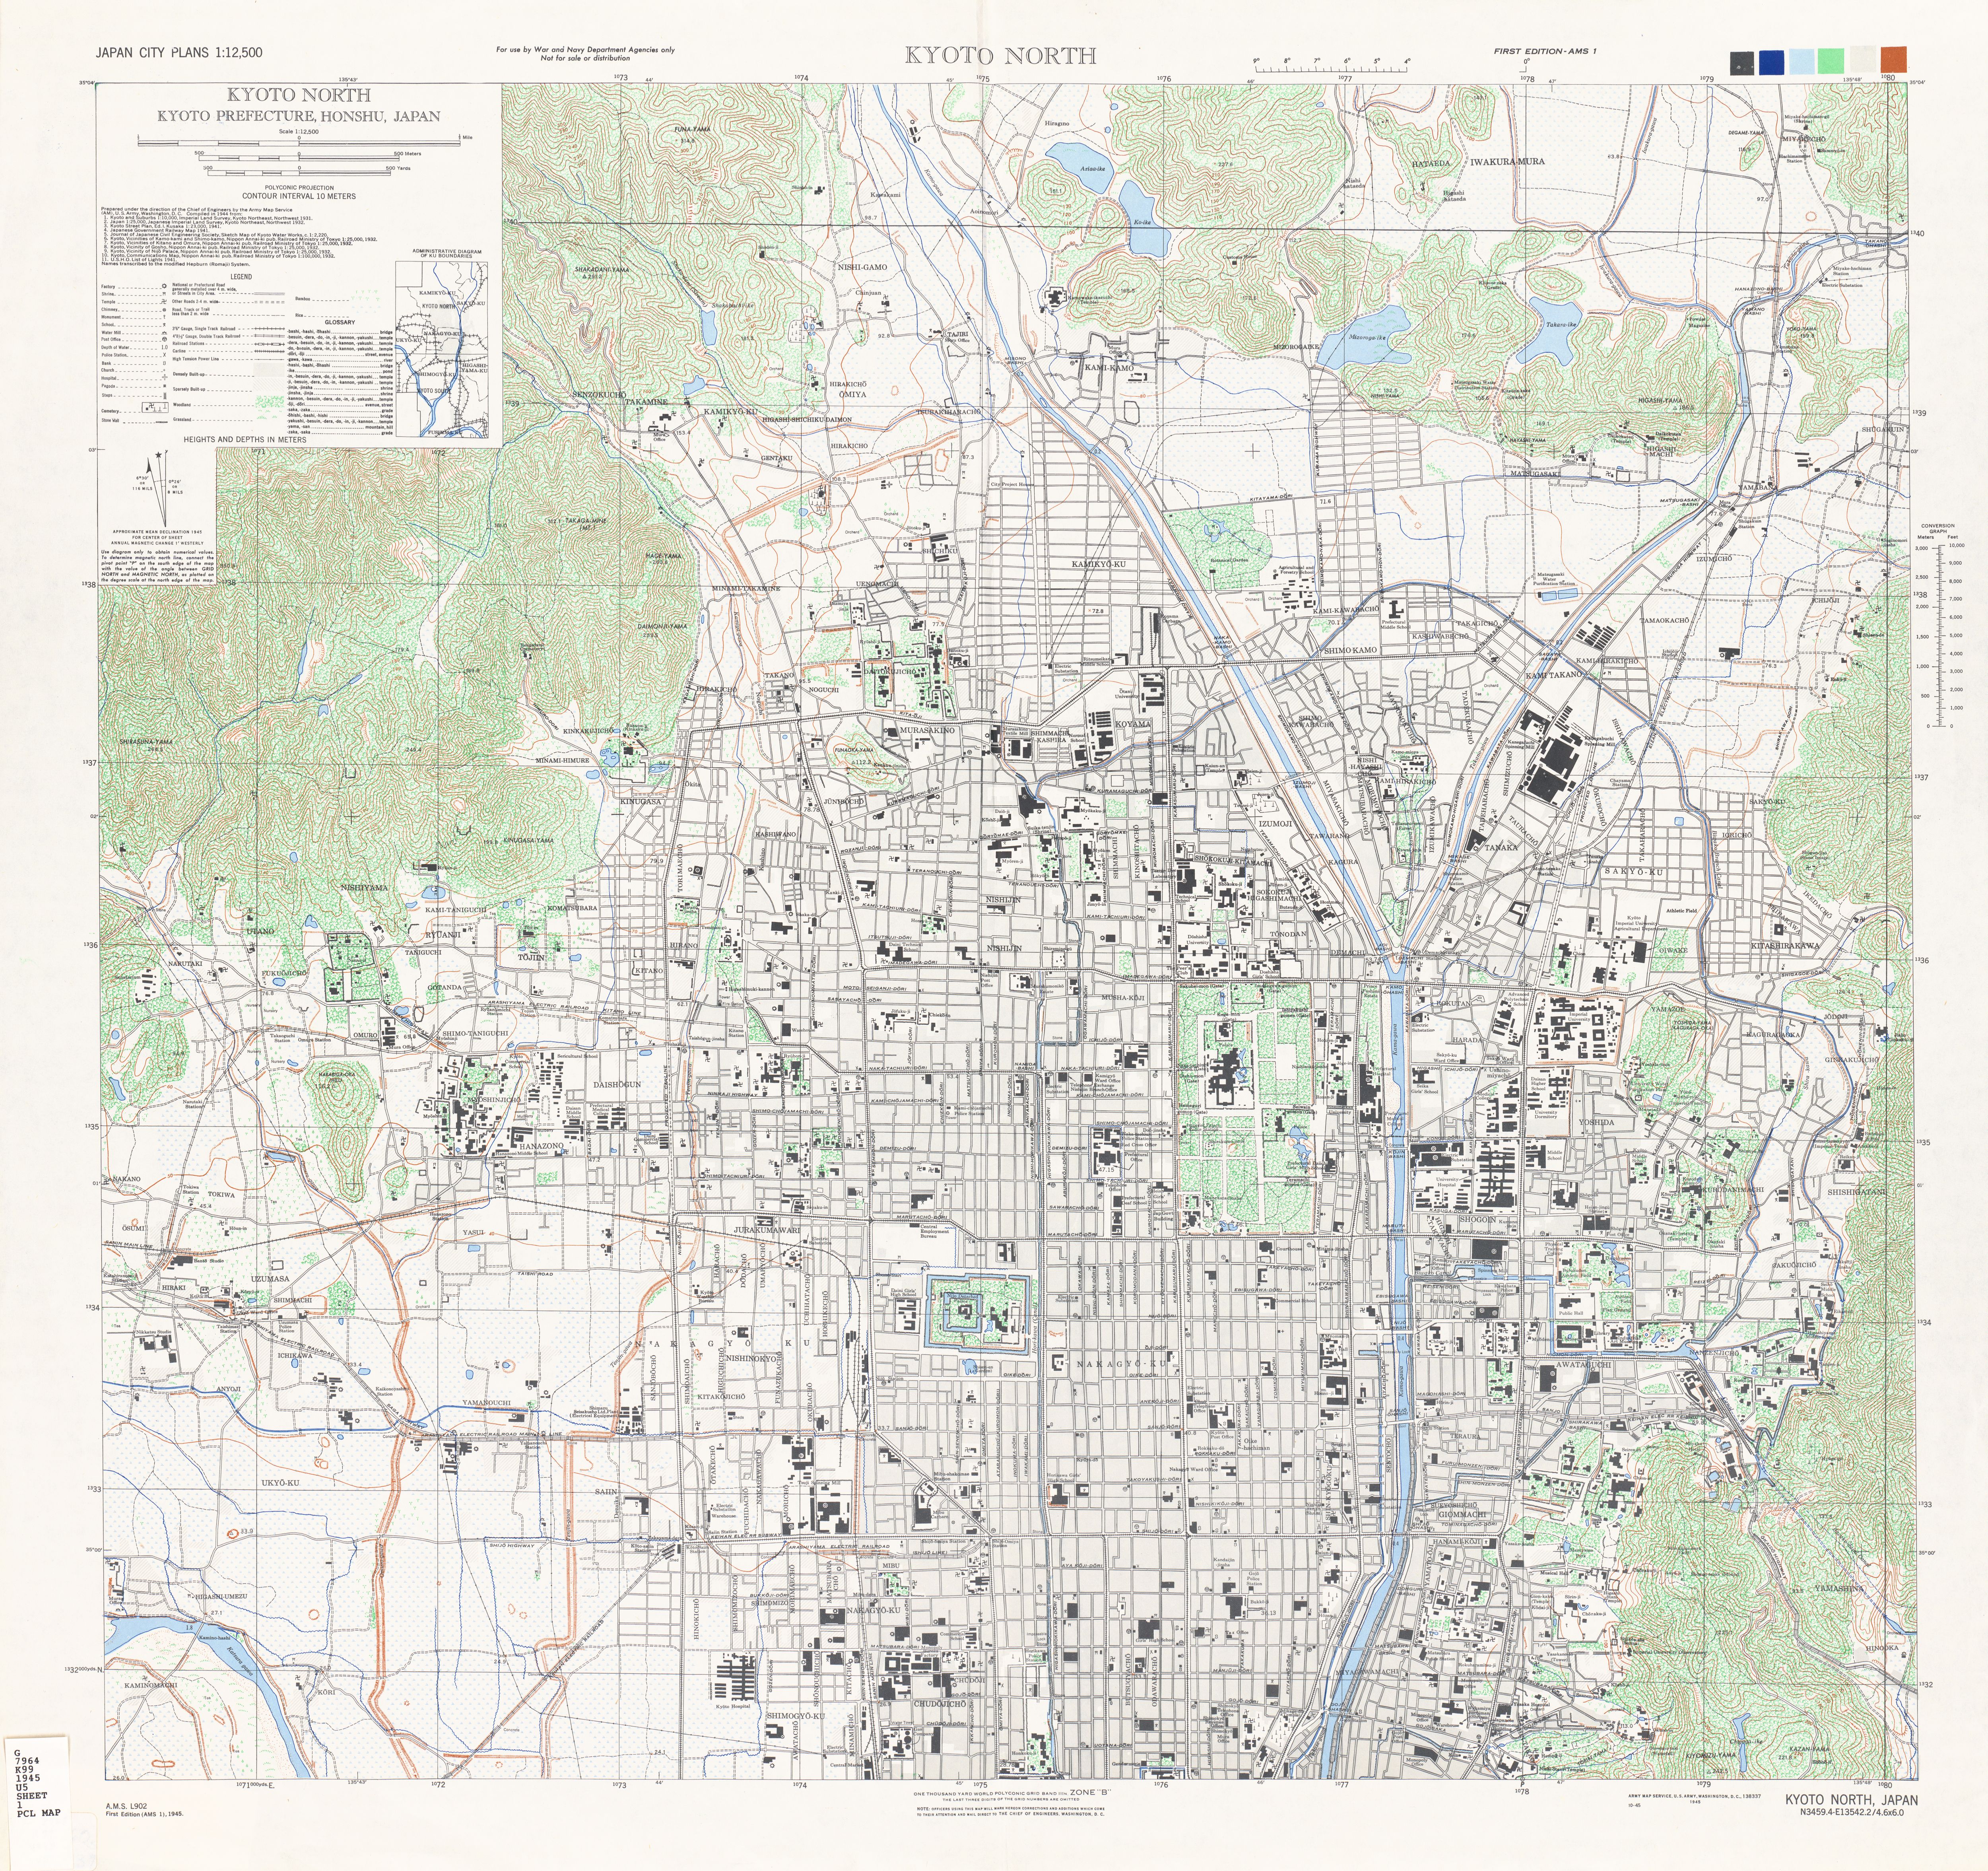
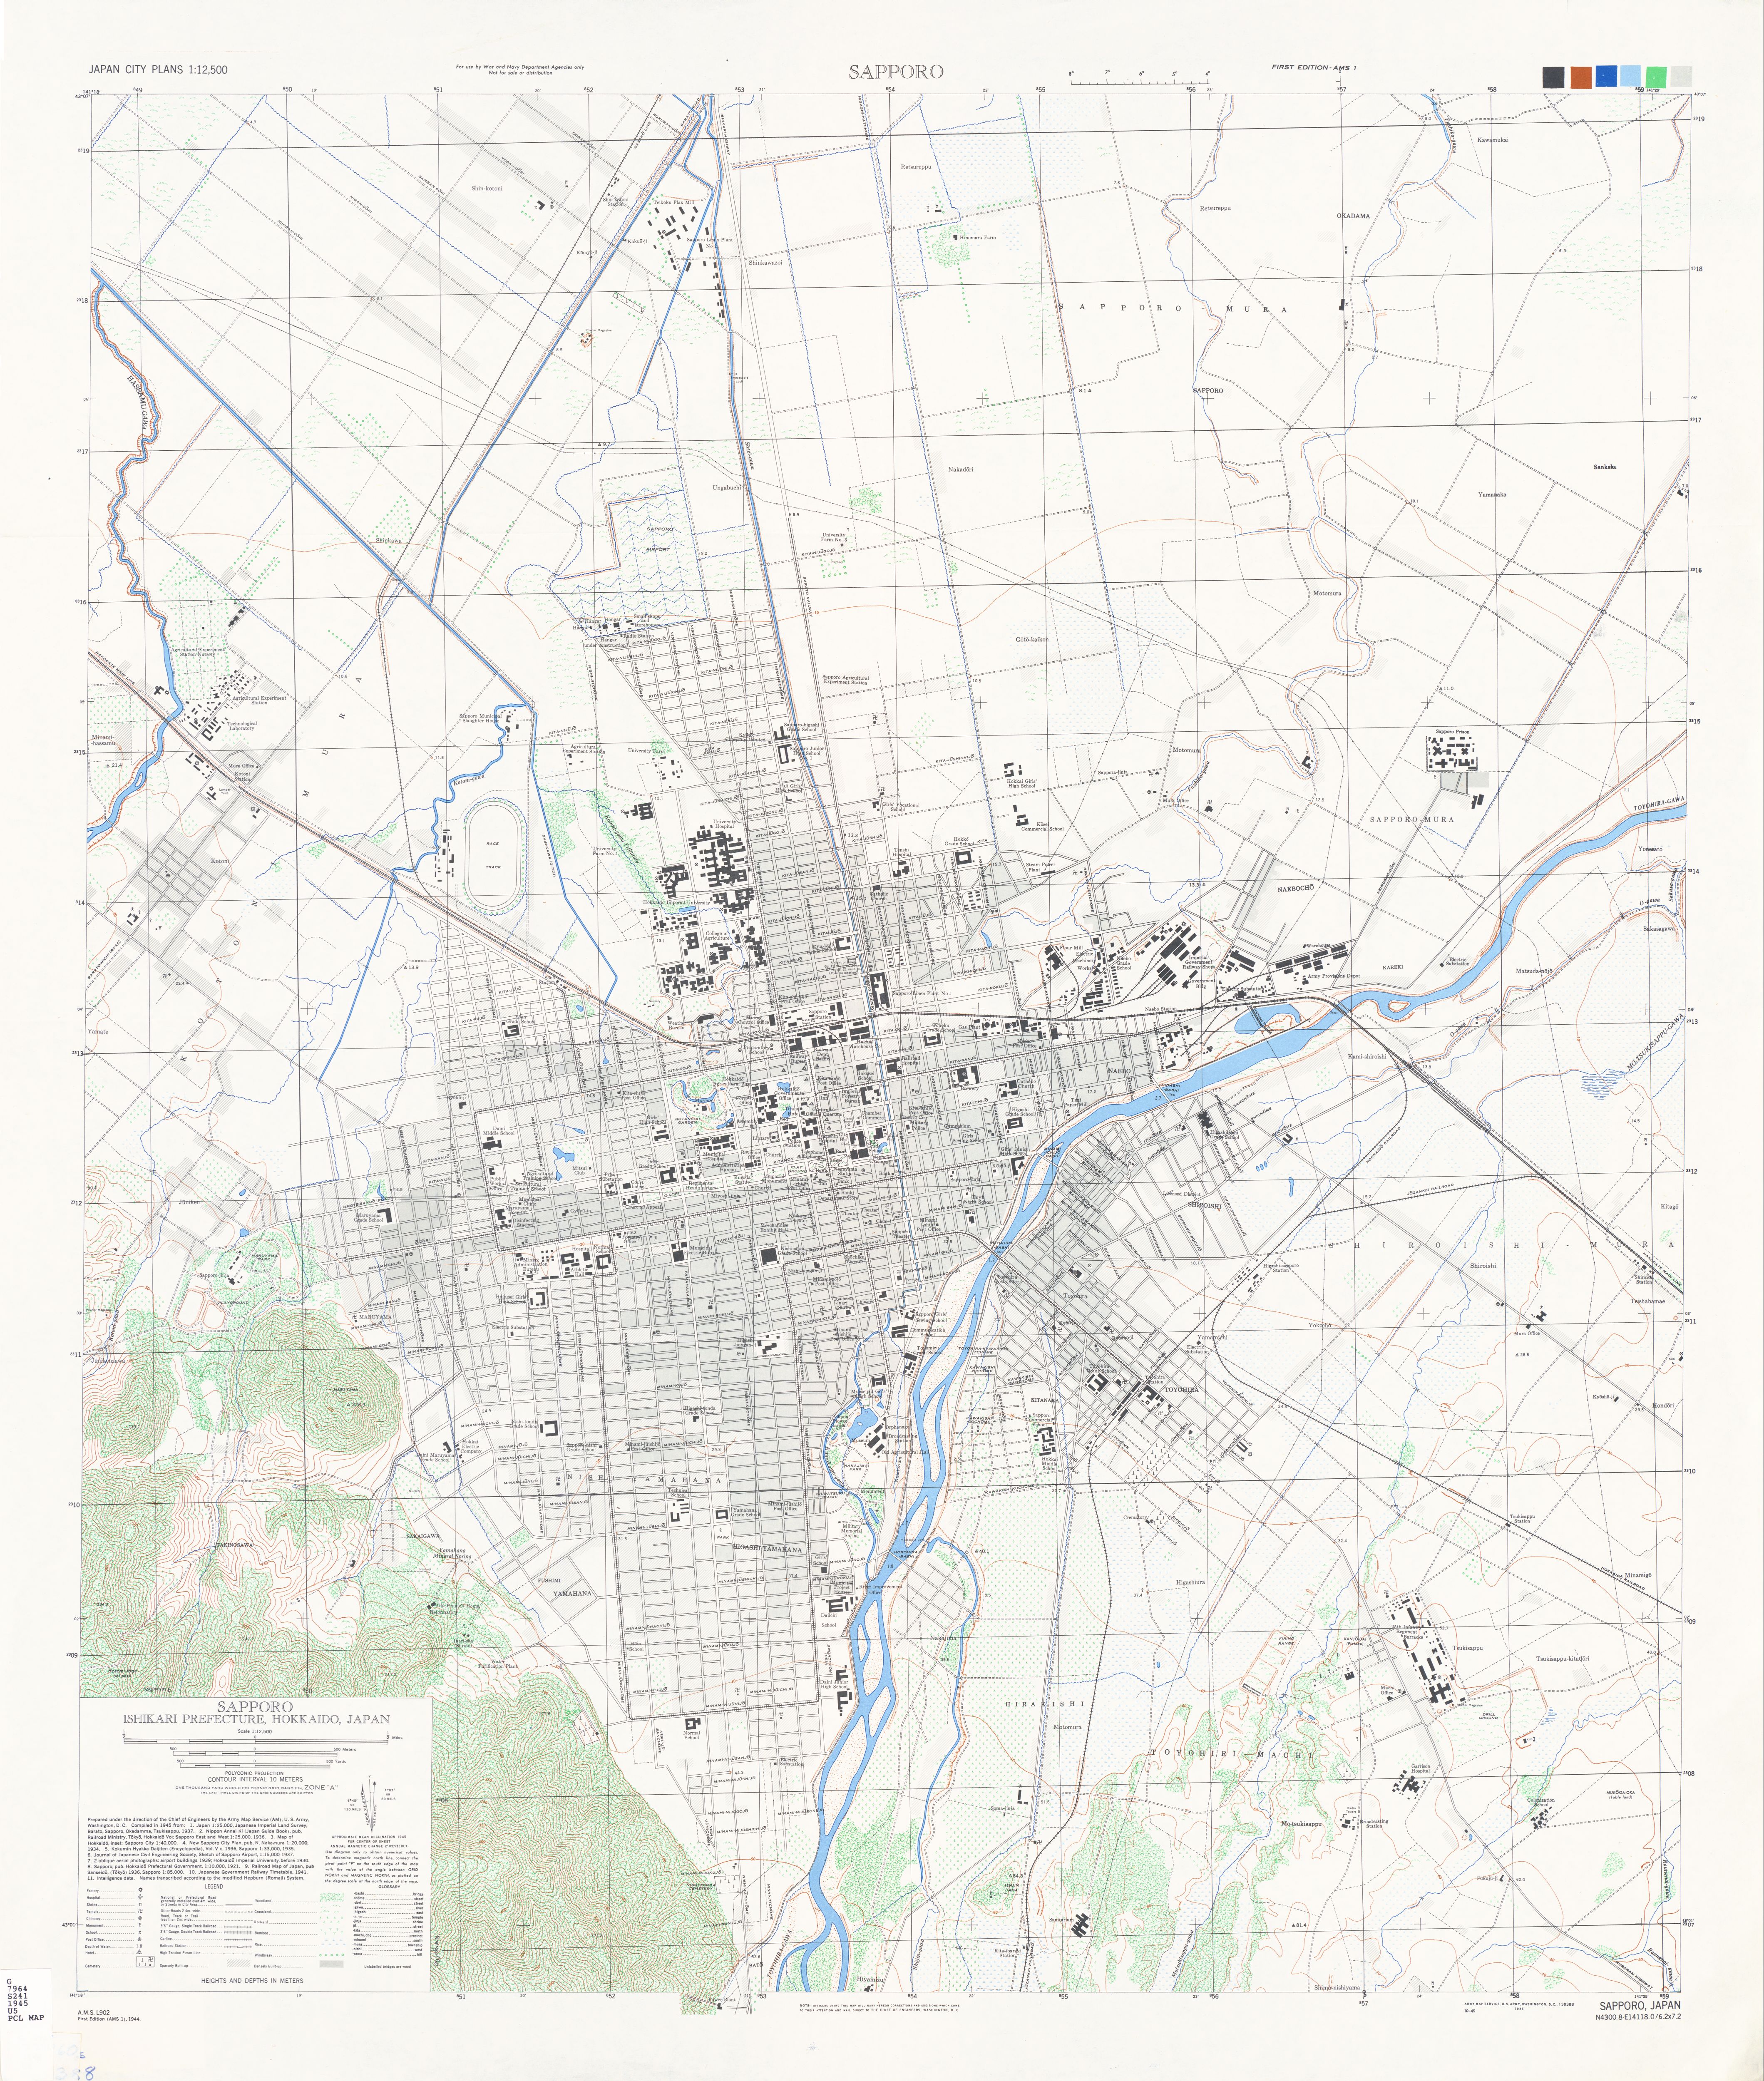
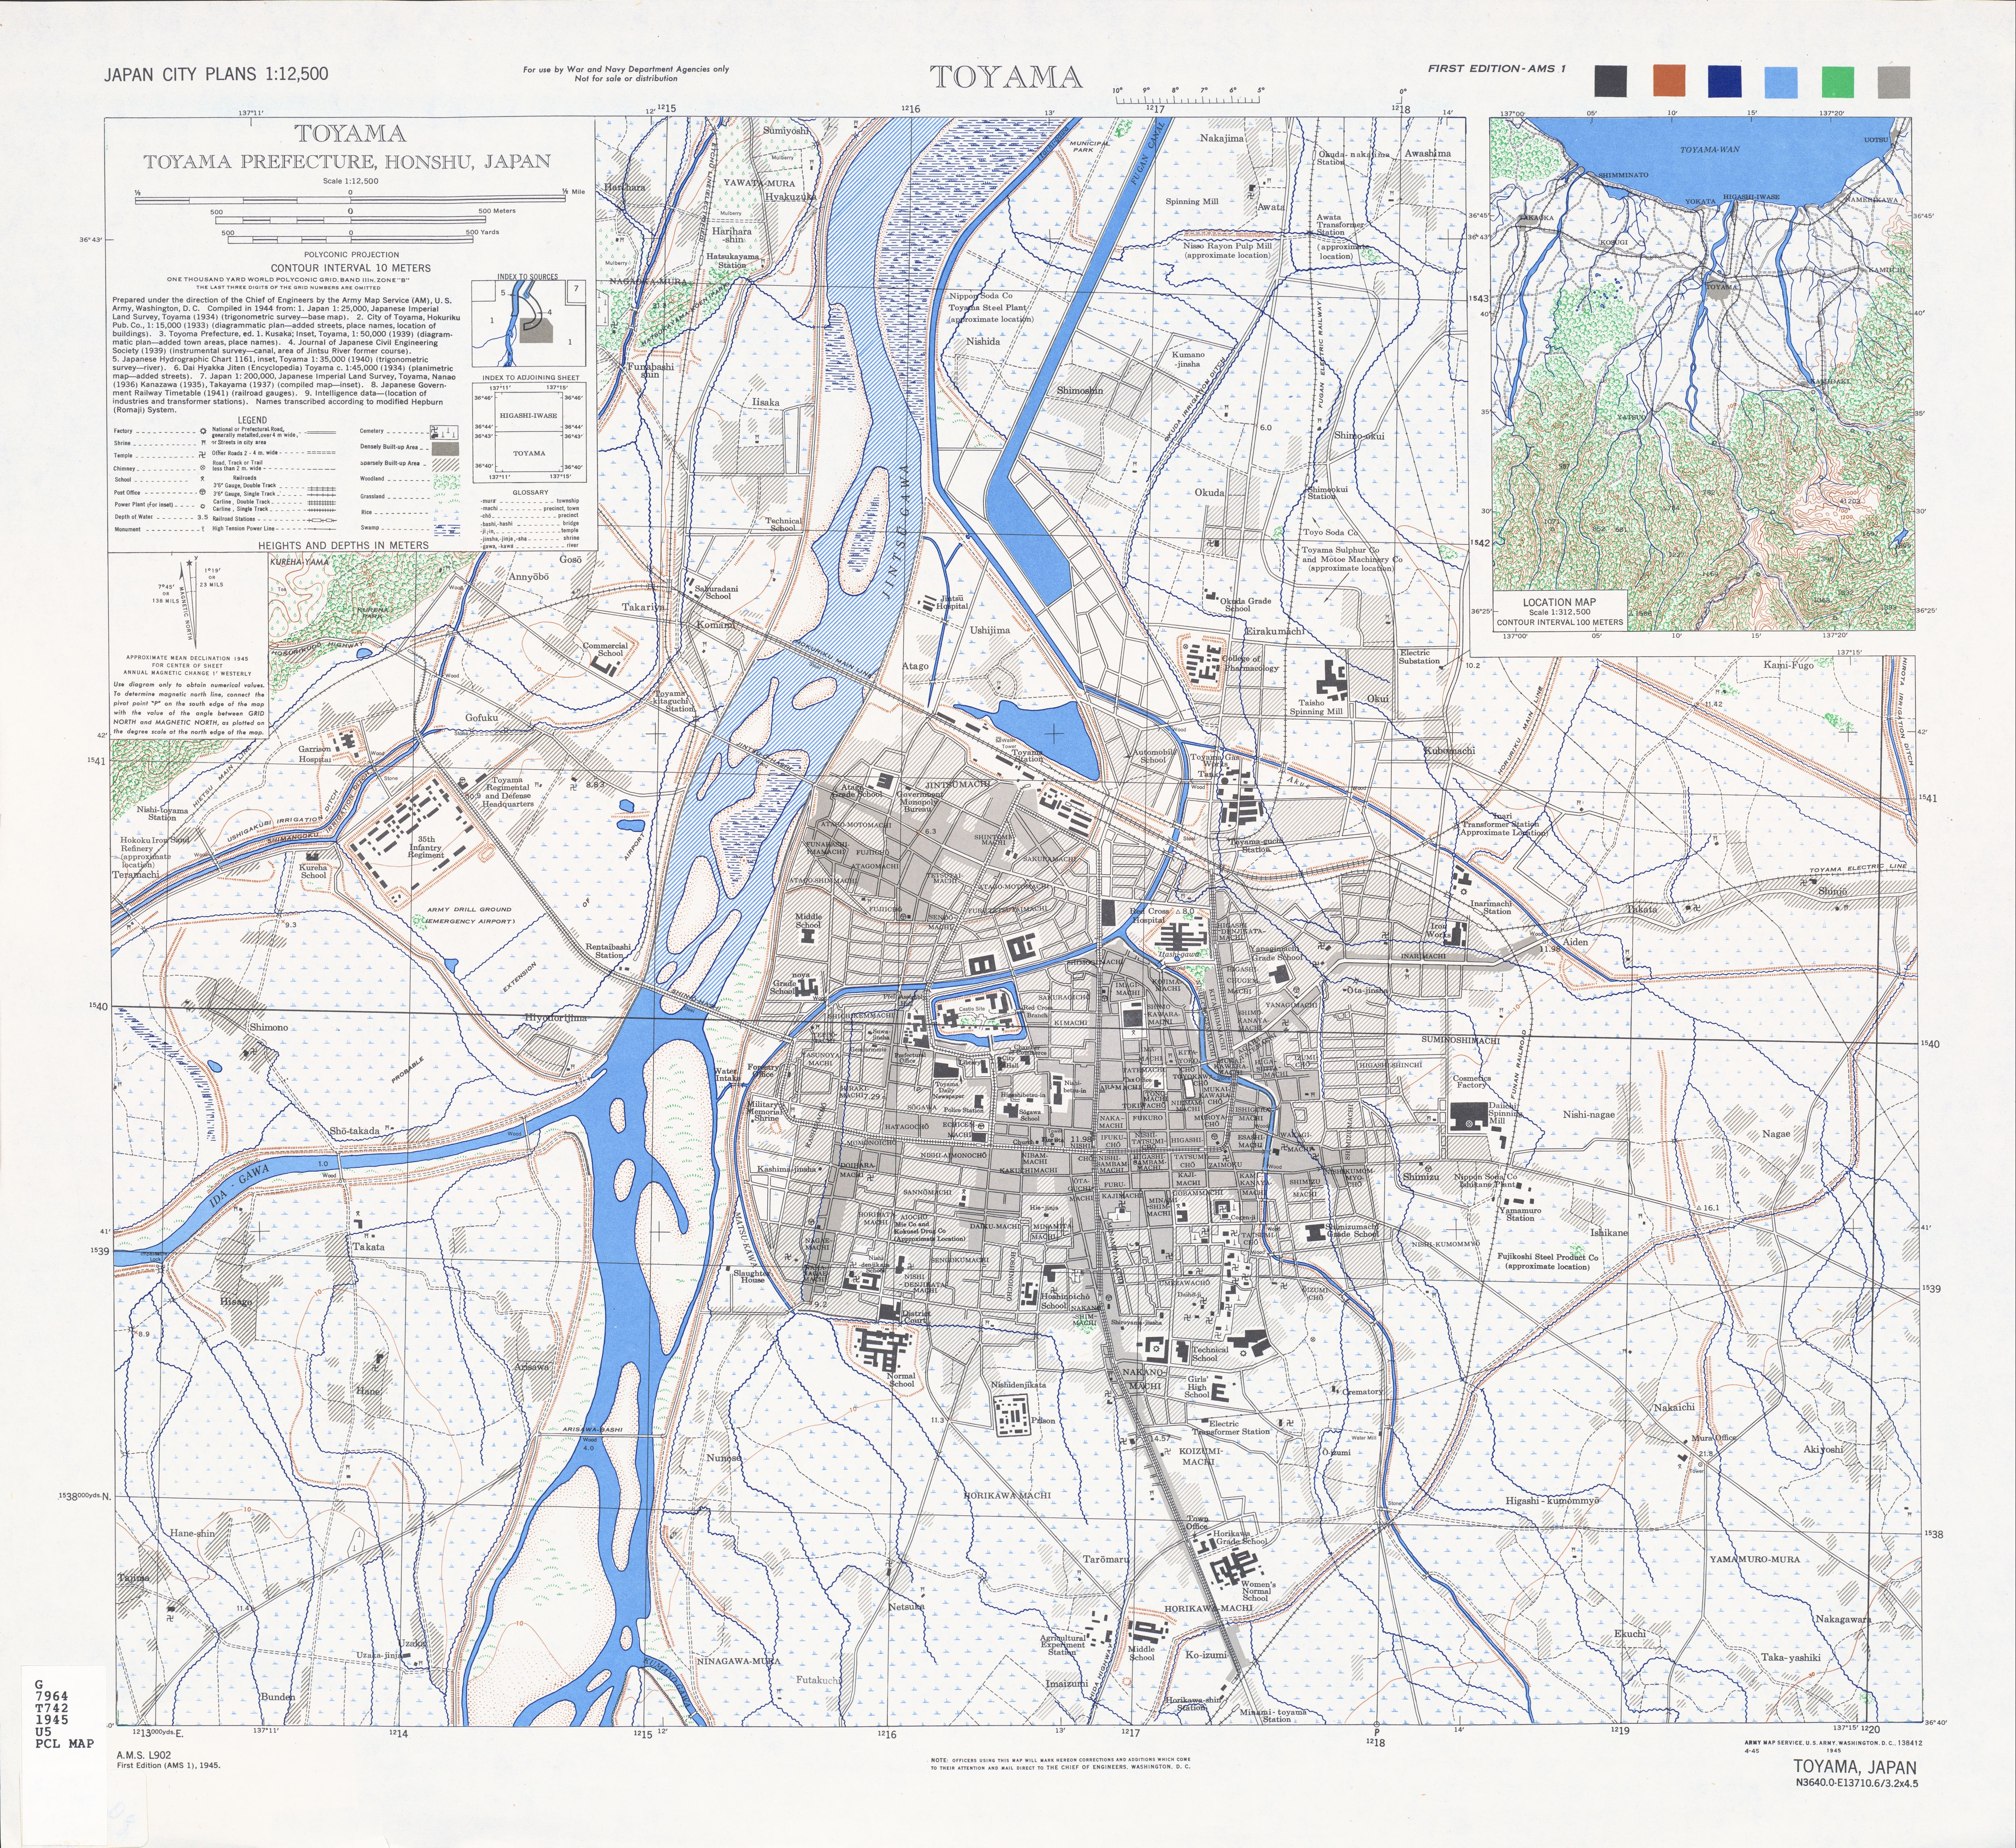
Note: There's maps of a lot of different cities in Japan. Check out the index here. Some notable maps: Kyoto North, Sapporo, Sasebo, Toyama, Nagasaki, Wakayama and Ichinomiya (with good overview of Nagoya). Nagoya actually gets a lot of maps: north-east, south-east, south-west and north-west. The mines in Ogaki get a map and so does Yokkaichi... these are the areas I've visited before around Minoakasaka and Tomida.
There's a lot of data in those maps. They mainly cover industrial/factory areas so that they could've done real damage to Japan's industry. Osaka doesn't seem to get a mention! The closest the maps get are Suita (OK, that's really close), Otsu and Seta, Yokkaichi and Wakayama.. but I'm repeating myself.
Kyoto City Tram (京都市電)
From the wikipedia article, the Kyoto Municipal Transportation Bureau ran the 京都市電 Kyōto Shiden Tram Network up until 1978. Ridership reached a peak in 1946, a second peak in 1955 and then progressively dropped towards 1978. The network was then closed in stages.
Studying the WW2 maps showed where the network was at the time. Intriguing, I had never known there was ever an 'outer loop' tram line of Kyoto. Tracing this around, I then found there were lines flowing south-east as well, down to the river adjunct with Inari Station and also south down to Station.
In the map below, you can see the alignment horizontal from the road that stops on the left. It seems there was also a bridge over the canal, but the maps I've seen show that the terminus was on the west bank (Just below the Neko Cafe TiME!!)
And down at Chūshojima, you can see where the trams veered east from their north-south direction into the station. The road indicates where the tram line was. The station building (where the blue station symbol is) was actually the tram terminus.
Umekoji still has a running example
At Umekoji roundhouse in Kyoto, it turns out there's still a functional example with it's own tram line. The museum is to be expanded in the near future, but I assume that the tram-line will survive.
From the shot below, you can see the line running from the south-west clockwise around to the north tip of the precinct.
There also seems to be a lot of preserved street cars around the museum. They're listed as "Umekoji Park", so I don't quite know if this is in the precinct or in the park to the east. I'll find out and update this when I visit the museum next. Read further down to see where the surviving rolling stock are located...
Did they ever finish that projected car line?
Check the map out here, you'll see that the US surveyors indicated that there was a strip of track that wasn't completed at the time. This map was created in 1944 from a miriad of sources. Check the bottom-right of the map to see who they used to create it.
The line is known as Nishiōjisen (にしおおじせん) 西大路線. There are two maps referenced on the main wiki page: the first one seems to indicate that this missing track is between 4th and 7th blocks (Nishiōji Shijo - Nishiōji Shichijo) and the second one doesn't show the outer loop at all!
The wiki page for the actual line indicates that trams were running from the June 3rd, 1935. The line was then extended further north with the connection from 7th to 9th blocks operating from December 12th 1938. If the maps were created in 1944, then their intelligence could have been quite wrong?
Other surviving rolling-stock
- Oomiya Kotsu Koen has No. 1 and 1860.
- Meiji Mura has No. 8
- I can't determine the location of No. 27. Who can translate this: "旧烏丸車庫で保存時代。復元・動態保存前、1982年6月1日撮影"
- Kyoto's Heian Shrine (平安神宮神苑) has かつての京都市電2両.
- Umejoki Park has 505, 703, 890, 935, 1605 and 2001.
- Ansho Elementary School has 726
- The Old Pueblo Trolley organisation in Tuscon, Arizona has 869 (Who would'da thought!)
- Kyoto Computer School has 1801 and 2603.
Further References
旅鉄おとーはん has a nice gallery here: 懐かしの京都市電ギャラリー. There is also a page with a map of the Kyoto Tram network!
むーさん has a great set of pages with random tram networks from Japan (it seems to be a quiz): 宮さんの全国路面電車アトランダム № 1. "No. 4" is a shot from Kyoto. Also here (No. 3) and then a whole page with shots of the network from 1961.
Conclusions
Declining ridership saw the end of this network... just another city to lose another form of transport. Sydney, Australia is a prime example of this! Will have to check out a few of the old alignments when I'm in Kyoto next.
Random Photos
Search
Tags
Links - Click for details
- Abandoned Rails (Japan)
- AIRLINE (Shinkansen Photography)
- Akihabara Station
- annexpressのブログ
- Australian Model Railway Magazine
- DCC普及協会ホームページ (Japanese DCC)
- Dead Section (Japanese Track Diagrams)
- Delicious Things (Japanese N Scale DCC)
- Densha Wotorou
- Digital Direct for Windows (DCC Server)
- Don's Dream World – AMAZING N Scale Japanese Layout
- Hatena::Diary
- Japanese N-Scale Modeling Forum
- JR Chiisai
- Kaz-T's blog レインボーライン (Rainbow Line)
- LED Resitance Calculator
- Masioka
- Poppondetta Blog
- RailFan Magazine, Japan
- Railmind
- Railway Travelers' Room
- Serenity Valley
- Shashinka Ichiban
- Shuzuku
- Sumida Crossing
- The next station is…
- Tomix N Gauge Track and Japanese N Gauge Trains
- TT Forums (Transport Tycoon Deluxe)
- 名鉄尾西線の貨物列車 (Nagoya: Meitetsu Freight)
- 日本型Nゲージ DCC改造例のご紹介 (Okiraku DCC)
- 泰 茅 轍 道 (Taichi Railway)
- 箱庭登山鉄道製作記 (Hakone-Tozan Layout Blog)
Archive
- July 2026
- May 2026
- April 2026
- March 2026
- February 2026
- January 2026
- November 2025
- October 2025
- September 2025
- August 2025
- July 2025
- June 2025
- February 2025
- January 2025
- November 2024
- September 2024
- August 2024
- July 2024
- June 2024
- May 2024
- April 2024
- March 2024
- February 2024
- December 2023
- October 2023
- September 2023
- August 2023
- July 2023
- June 2023
- May 2023
- April 2023
- March 2023
- December 2022
- November 2022
- October 2022
- April 2022
- March 2022
- February 2022
- January 2022
- December 2021
- November 2021
- September 2021
- August 2021
- July 2021
- May 2021
- March 2021
- February 2021
- January 2021
- October 2020
- September 2020
- August 2020
- July 2020
- June 2020
- May 2020
- April 2020
- March 2020
- January 2020
- December 2019
- November 2019
- October 2019
- September 2019
- August 2019
- July 2019
- June 2019
- April 2019
- March 2019
- February 2019
- January 2019
- December 2018
- November 2018
- October 2018
- September 2018
- August 2018
- July 2018
- June 2018
- May 2018
- April 2018
- March 2018
- January 2018
- December 2017
- November 2017
- October 2017
- September 2017
- August 2017
- July 2017
- June 2017
- May 2017
- March 2017
- February 2017
- January 2017
- December 2016
- November 2016
- October 2016
- September 2016
- August 2016
- July 2016
- June 2016
- May 2016
- February 2016
- November 2015
- October 2015
- September 2015
- August 2015
- July 2015
- June 2015
- May 2015
- April 2015
- March 2015
- February 2015
- January 2015
- December 2014
- November 2014
- August 2014
- July 2014
- May 2014
- April 2014
- March 2014
- December 2013
- November 2013
- October 2013
- June 2013
- August 2012
- April 2012
- March 2012
- February 2012
- November 2011
- October 2011
- September 2011
- July 2011
- June 2011
- May 2011
- April 2011
- March 2011
- February 2011
- January 2011
- December 2010
- November 2010
- October 2010
- September 2010
- August 2010
- June 2010
- May 2010
- April 2010
- March 2010
- February 2010
- January 2010
- December 2009
- November 2009
- October 2009
- August 2009
- January 2009
- December 2008
- November 2008
- October 2008
- September 2008
- July 2008